Please upgrade your Keptn to a newer release.
Home / Docs / Release 0.5.2 / Reference / Setup Monitoring / Dynatrace
Dynatrace
In order to evaluate the quality gates and allow self-healing in production, we have to set up monitoring to get the needed data.
Prerequisites
Please make sure to have the following tool(s) installed:
- jq - a lightweight and flexible command-line JSON processor.
Open for installation instructions
  sudo apt-get update
  sudo apt install jq -y
Setup Dynatrace
Bring your Dynatrace SaaS or Dynatrace-managed tenant
If you don’t have a Dynatrace tenant, sign up for a free trial or a developer account.
Create a Dynatrace API Token
Log in to your Dynatrace tenant, and go to Settings > Integration > Dynatrace API. Then, create a new API token with the following permissions:
- Access problem and event feed, metrics and topology
- Access logs
- Configure maintenance windows
- Read configuration
- Write configuration
- Capture request data
- Real user monitoring JavaScript tag management
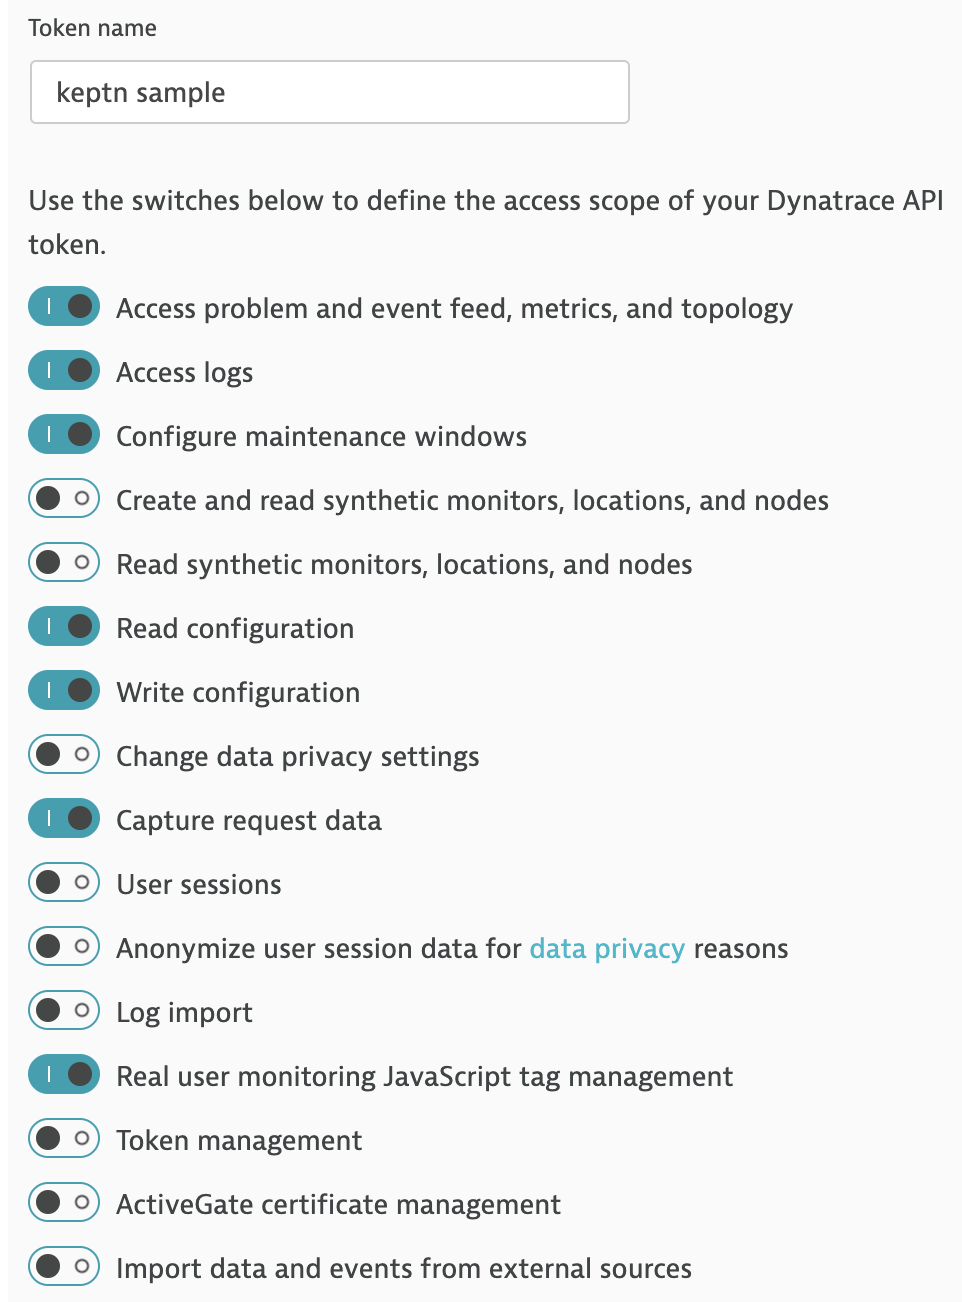
Dynatrace API Token Create a Dynatrace PaaS Token
In your Dynatrace tenant, go to Settings > Integration > Platform as a Service, and create a new PaaS Token.
Clone the install repository and setup your credentials by executing the following steps:
git clone --branch 0.3.1 https://github.com/keptn-contrib/dynatrace-service --single-branchcd dynatrace-service/deploy/scripts./defineDynatraceCredentials.shWhen the script asks for your Dynatrace tenant, please enter your tenant according to the appropriate pattern:
- Dynatrace SaaS tenant:
{your-environment-id}.live.dynatrace.com - Dynatrace-managed tenant:
{your-domain}/e/{your-environment-id}
- Dynatrace SaaS tenant:
Execute the installation script for your platform:
- If you are on Azure AKS, please execute
./deployDynatraceOnAKS.sh- If you are on AWS EKS, please execute
./deployDynatraceOnEKS.sh- If you are on Google GKE, please execute
./deployDynatraceOnGKE.shAlso, please read **Note 2** after this section in case you are running GKE Container-optimized os.- If you are on Pivotal PKS, please execute
./deployDynatraceOnPKS.sh- If you are on OpenShift, please execute
./deployDynatraceOnOpenshift.sh
When this script is finished, the Dynatrace OneAgent and the dynatrace-service are deployed in your cluster. Execute the following commands to verify the deployment of the OneAgent as well as of the dynatrace-service.
kubectl get svc dynatrace-service -n keptn
NAME                TYPE        CLUSTER-IP    EXTERNAL-IP   PORT(S)    AGE
dynatrace-service   ClusterIP   10.0.44.191   <none>        8080/TCP   2m48s
kubectl get pods -n dynatrace
NAME                                           READY   STATUS    RESTARTS   AGE
dynatrace-oneagent-operator-7f477bf78d-dgwb6   1/1     Running   0          12m
oneagent-5lcqh                                 0/1     Running   0          3s
oneagent-ps6t4                                 0/1     Running   0          3s
Note 1: To monitor the services that are already onboarded in the dev, staging, and production namespace, make sure to restart the pods. If you defined different environments in your shipyard file, please adjust the values accordingly.
kubectl delete pods --all --namespace=sockshop-dev
kubectl delete pods --all --namespace=sockshop-staging
kubectl delete pods --all --namespace=sockshop-production
Note 2: If the nodes in your cluster run on Container-Optimized OS (cos) (default for GKE), the Dynatrace OneAgent might not work properly, and another step is necessary. To verify that the OneAgent does not work properly, the output of kubectl get pods -n dynatrace might look as follows:
NAME                                           READY   STATUS             RESTARTS   AGE
dynatrace-oneagent-operator-7f477bf78d-dgwb6   1/1     Running            0          8m21s
oneagent-b22m4                                 0/1     Error              6          8m15s
oneagent-k7jn6                                 0/1     CrashLoopBackOff   6          8m15s
This means that after the initial setup with deployDynatrace.sh, which is a step below, the cr.yml has to be edited and applied again.
You can do that by editing the already downloaded cr.yml in ../manifests/dynatrace/gen. Change
env: []
to
  env:
  - name: ONEAGENT_ENABLE_VOLUME_STORAGE
    value: "true"
Finally, don’t forget to restart the pods as described in Note 1 above.
What has been set up?
In your Dynatrace tenant, when you navigate to Settings > Tags > Automatically applied tags you will find two entries:
- environment
- service
- test-subject
This means that Dynatrace will automatically apply tags to your onboarded services.
In addition, a Problem Notification has automatically been set up to inform a Keptn of any problems with your services to allow auto-remediation. This will be described in more detail in the Runbook Automation tutorial. You can check the problem notification by navigating to Settings > Integration > Problem notifications and you will find a keptn remediation problem notification.
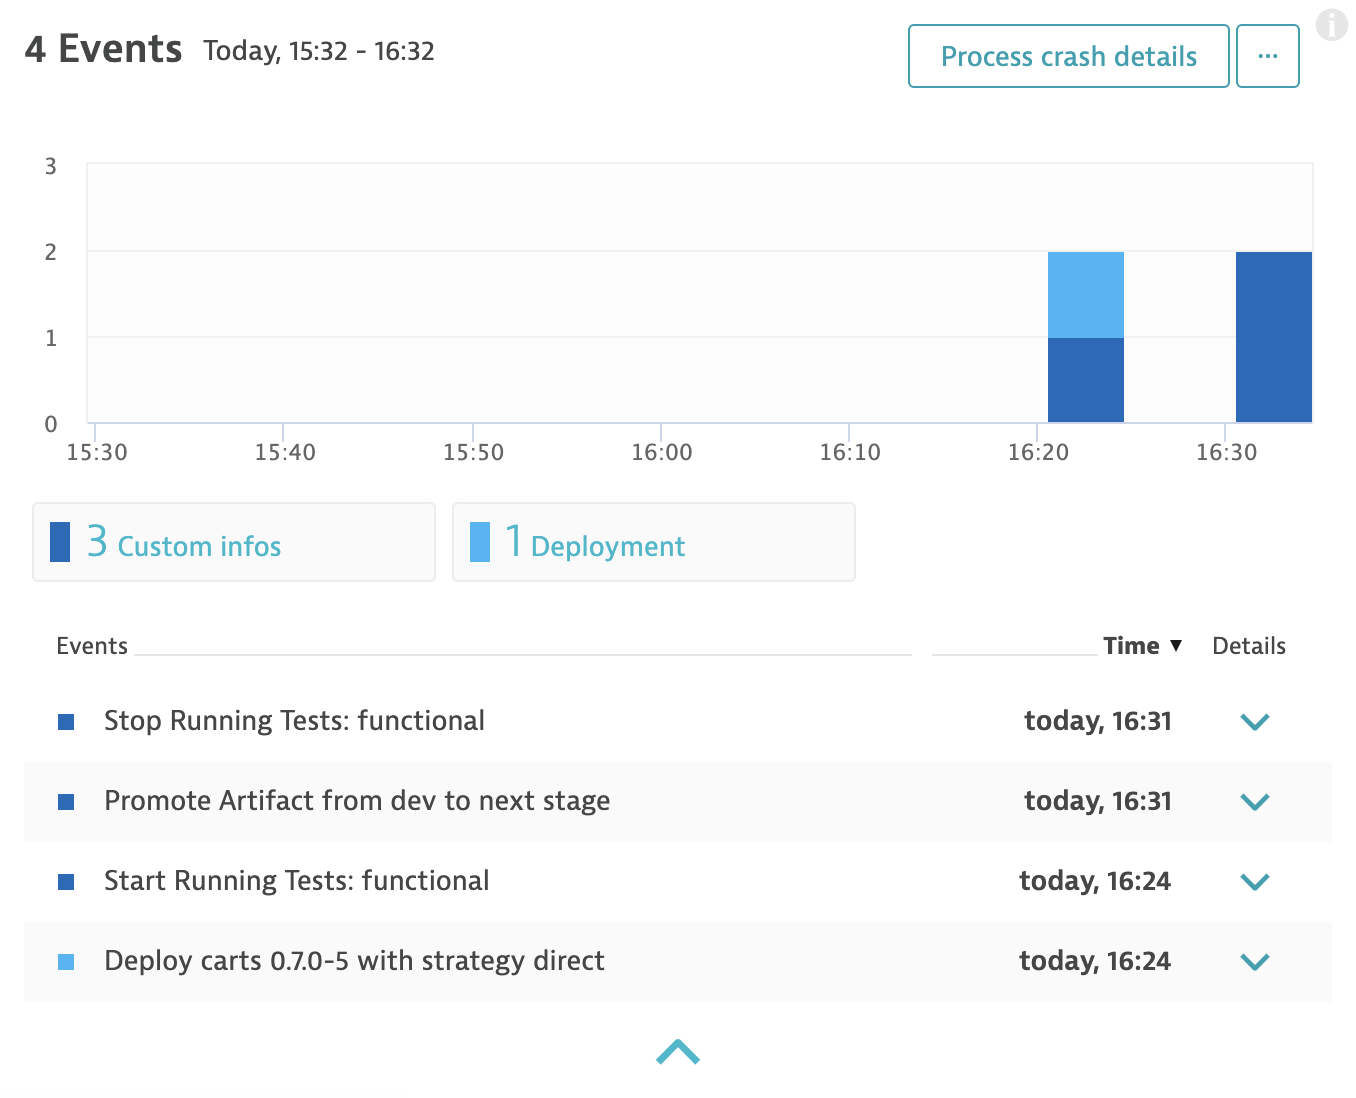
See Keptn events in Dynatrace
The dynatrace-service in Keptn will take care of pushing events of the Keptn workflow to the artifacts that have been onboarded. For example, the deployment as well as custom infos like starting and finishing of tests will appear in the details screen of your services in your Dynatrace tenant.
(optional) Create process group naming rule in Dynatrace
Create a naming rule for process groups
- Go to Settings, Process and containers, and click on Process group naming.
- Create a new process group naming rule with Add new rule.
- Edit that rule:
- Rule name:
Container.Namespace - Process group name format:
{ProcessGroup:KubernetesContainerName}.{ProcessGroup:KubernetesNamespace} - Condition:
Kubernetes namespace>exits
- Rule name:
- Click on Preview and Save.
Screenshot shows this rule definition.
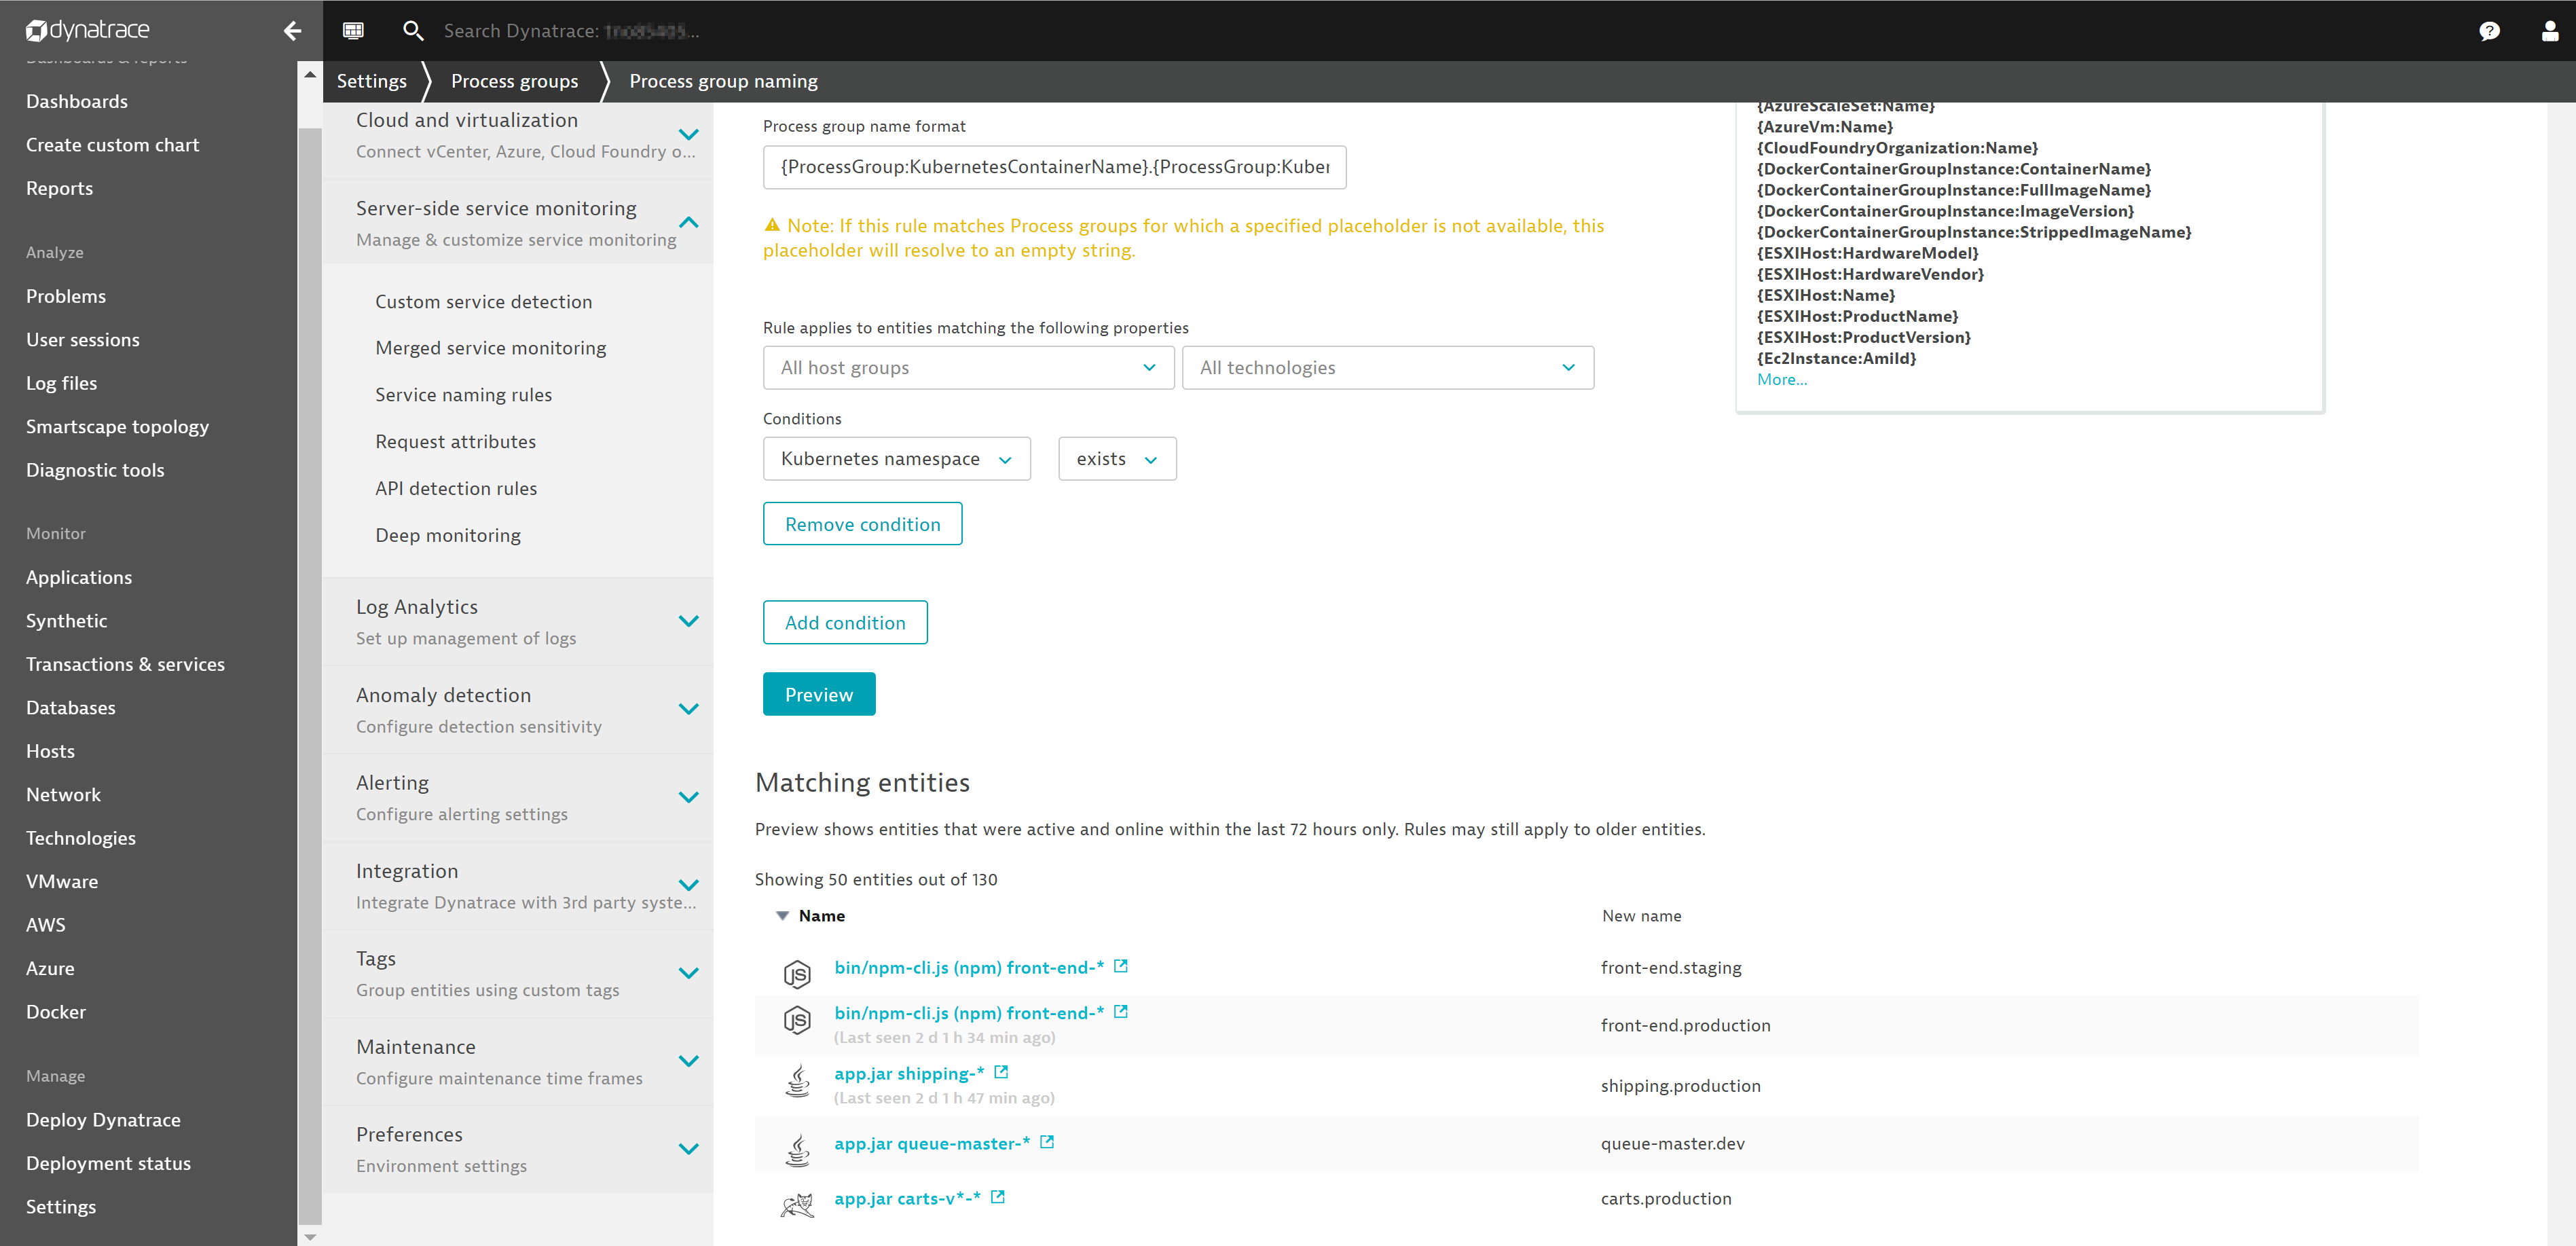
Dynatrace naming rule
Uninstall Dynatrace
If you want to uninstall Dynatrace, there are scripts provided to do so. Uninstalling Keptn will not automatically uninstall Dynatrace.
- (optional) If you do not have the dynatrace-service repository, clone the latest release using:
git clone --branch 0.3.1 https://github.com/keptn-contrib/dynatrace-service --single-branch
- Go to correct folder and execute the
uninstallDynatrace.shscript:
cd dynatrace-service/deploy/scripts
./uninstallDynatrace.sh
Built with  by Dynatrace