Please upgrade your Keptn to a newer release.
Home / Docs / Release 0.5.2 / Tutorials / Runbook Automation
Runbook Automation
Gives an overview of how to leverage the power of runbook automation to build self-healing applications. Therefore, you will use ServiceNow workflows that are triggered to remediate incidents.
About this tutorial
Configuration changes during runtime are sometimes necessary to increase flexibility. A prominent example are feature flags that can be toggled also in a production environment. In this tutorial, we will change the promotion rate of a shopping cart service, which means that a defined percentage of interactions with the shopping cart will add promotional items (e.g., small gifts) to the shopping carts of our customers. However, we will experience troubles with this configuration change. Therefore, we will set means in place that are capable of auto-remediating issues at runtime. In fact, we will leverage workflows in ServiceNow.
Prerequisites
Finish the Onboarding a Service tutorial.
- Note: For this tutorial, the Onboarding a Service tutorial has to be completed exactly as it is described. The scripts provided in the current tutorial rely on values that are set during the onboarding of the carts service. Thus, this tutorial might not work as expected if values are changed.
ServiceNow instance or free ServiceNow developer instance
Setup of Dynatrace for monitoring is mandatory
Clone the GitHub repository with the necessary files for the tutorial:
git clone --branch 0.1.4 https://github.com/keptn-contrib/servicenow-service.git --single-branchcd servicenow-service
Configure Keptn
In order for Keptn to use both ServiceNow and Dynatrace, the corresponding credentials have to be stored as Kubernetes secrets in the cluster.
Dynatrace secret
The Dynatrace secret should already have been created while setting up Dynatrace monitoring. Please verify your Dynatrace secret by executing the following commands:
kubectl get secret dynatrace -n keptn -o yaml
The output should include the DT_API_TOKEN and the DT_TENANT (both will be shown in base64 encoding):
apiVersion: v1
data:
  DT_API_TOKEN: xxxxxx
  DT_TENANT: xxxxxx
kind: Secret
metadata:
  creationTimestamp:
  ...
The DT_API_TOKEN and the DT_TENANT need to be stored in an environment variable. Therefore, copy and paste the following command to make sure that DT_TENANT stores a url that follows the pattern {your-domain}/e/{your-environment-id} for a managed Dynatrace tenant or {your-environment-id}.live.dynatrace.com for a SaaS tenant.
export DT_TENANT=$(kubectl get secret dynatrace -n keptn -o=jsonpath='{.data.DT_TENANT}' | base64 --decode)
export DT_API_TOKEN=$(kubectl get secret dynatrace -n keptn -o=jsonpath='{.data.DT_API_TOKEN}' | base64 --decode)
echo $DT_TENANT $DT_API_TOKEN
ServiceNow secret
Create the ServiceNow secret to allow Keptn to create/update incidents in ServiceNow and run workflows. For the command below, use your ServiceNow tenant id (8-digits), your ServiceNow user (e.g., admin) as user, and your ServiceNow password as token:
kubectl -n keptn create secret generic servicenow --from-literal="tenant=xxx" --from-literal="user=xxx" --from-literal="token=xxx"
Note: If your ServiceNow password has some special characters in it, you need to escape them.
Setup the workflow in ServiceNow
A ServiceNow Update Set is provided to run this tutorial. To install the Update Set follow these steps:
- Login to your ServiceNow instance.
Look for update set in the left search box and navigate to Update Sets to Commit
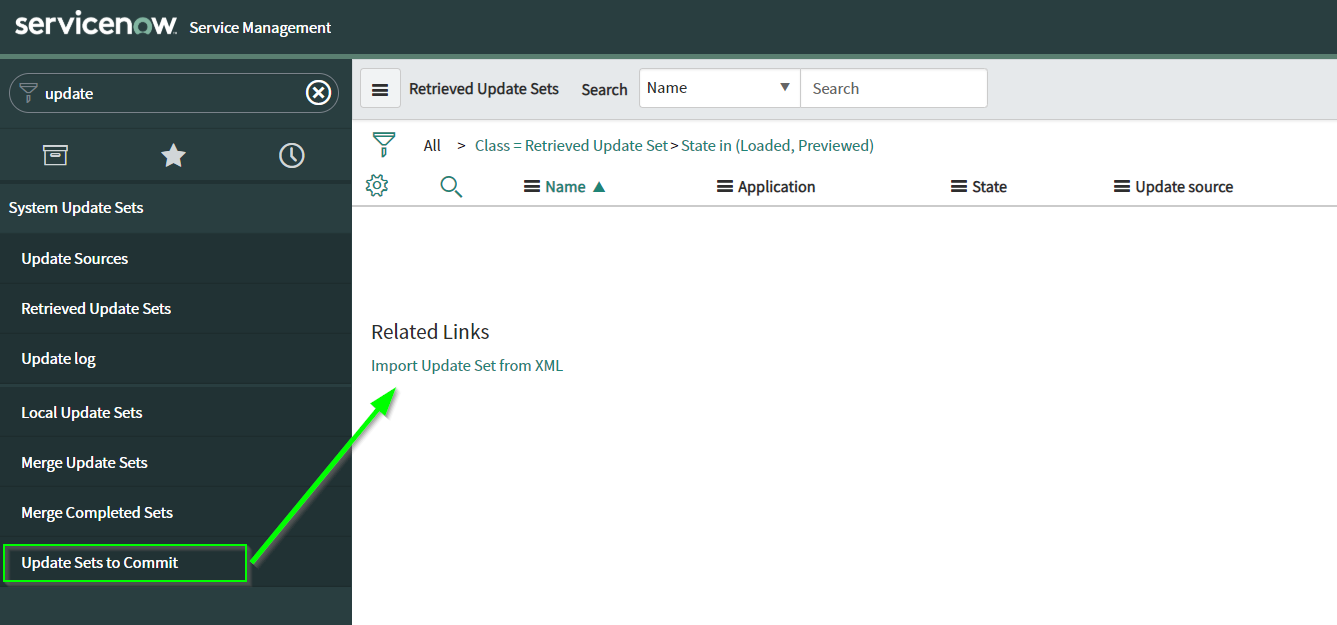
ServiceNow Update Set Click on Import Update Set from XML
Import and Upload the file from your file system that you find in your
servicenow-service/usecasefolder:keptn_demo_remediation_updateset.xmlOpen the Update Set

ServiceNow Update Sets List In the right upper corner, click on Preview Update Set and once previewed, click on Commit Update Set to apply it to your instance
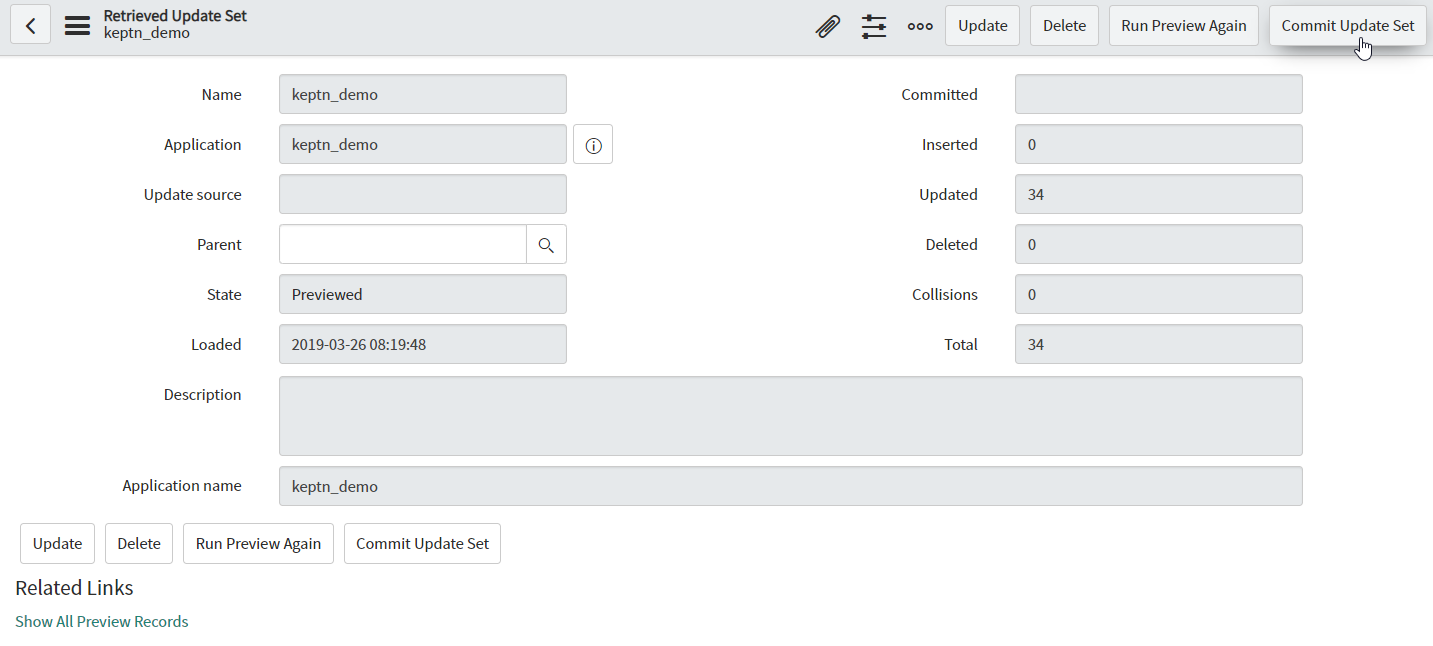
ServiceNow Update Set Commit After importing, enter keptn as the search term into the upper left search box.
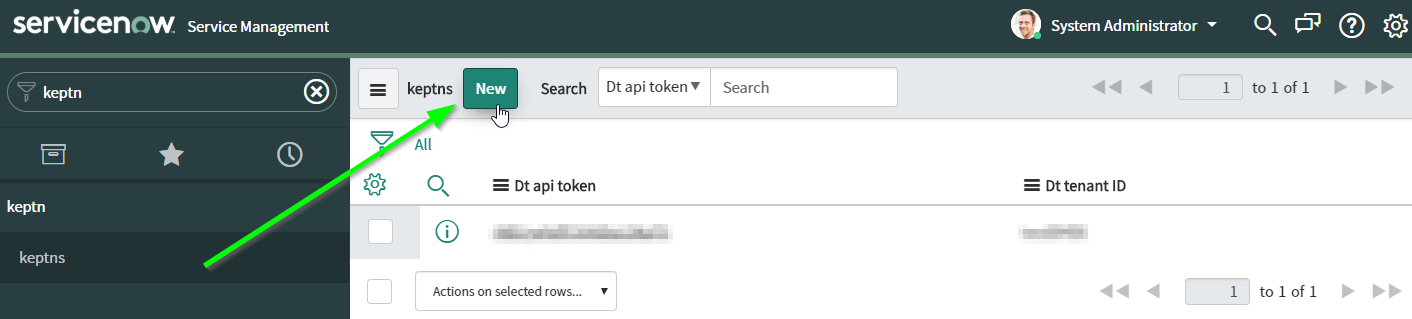
ServiceNow keptn credentials Click on New and enter your Dynatrace API token as well as your Dynatrace tenant.
(optional) You can also take a look at the predefined workflow that is able to handle Dynatrace problem notifications and remediate issues.
- Navigate to the workflow editor by typing Workflow Editor and clicking on the item Workflow > Workflow Editor
- The workflow editor is opened in a new window/tab
- Look for the workflow keptn_demo_remediation (it might as well be on the second or third page)
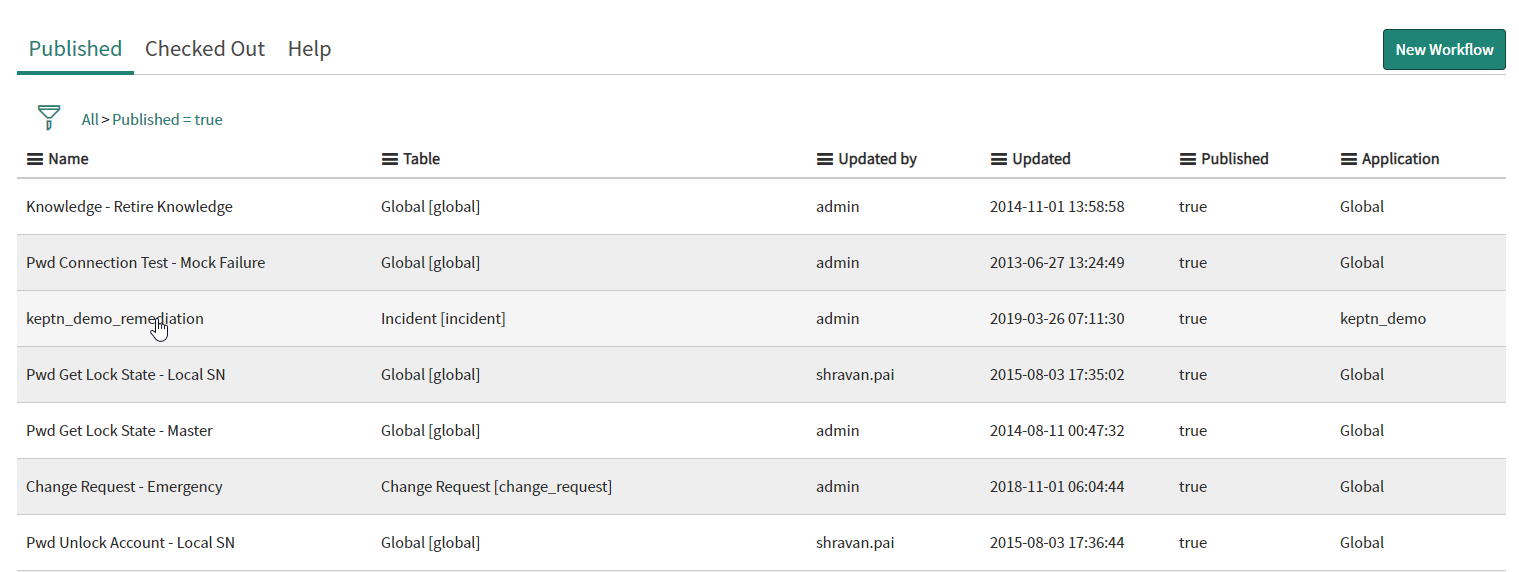
ServiceNow Keptn workflow - Open the workflow by clicking on it. It will look similar to the following image. By clicking on the workflow notes you can further investigate each step of the workflow.
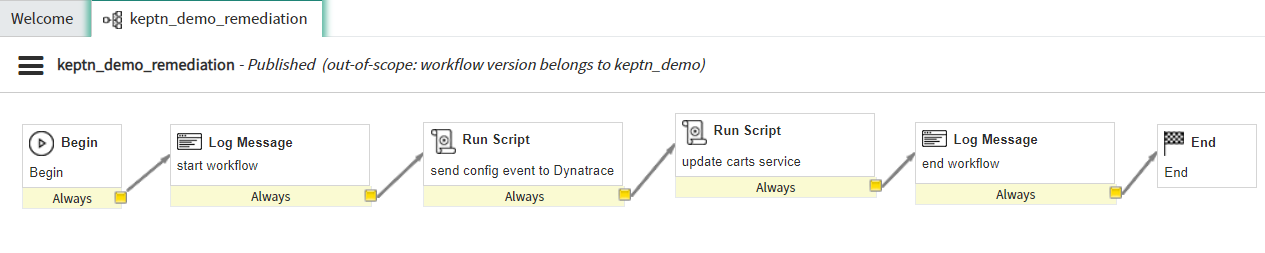
ServiceNow Keptn workflow
(optional): Verify Dynatrace problem notification
During the setup of Dynatrace a problem notification has already been set up for you. You can verify the correct setup by following the instructions:
- Login to your Dynatrace tenant.
- Navigate to Settings > Integration > Problem notifications
- Click on Set up notifications and select Custom integration
- Click on Keptn remediation
The problem notification should look similar to the one in this screen shot:
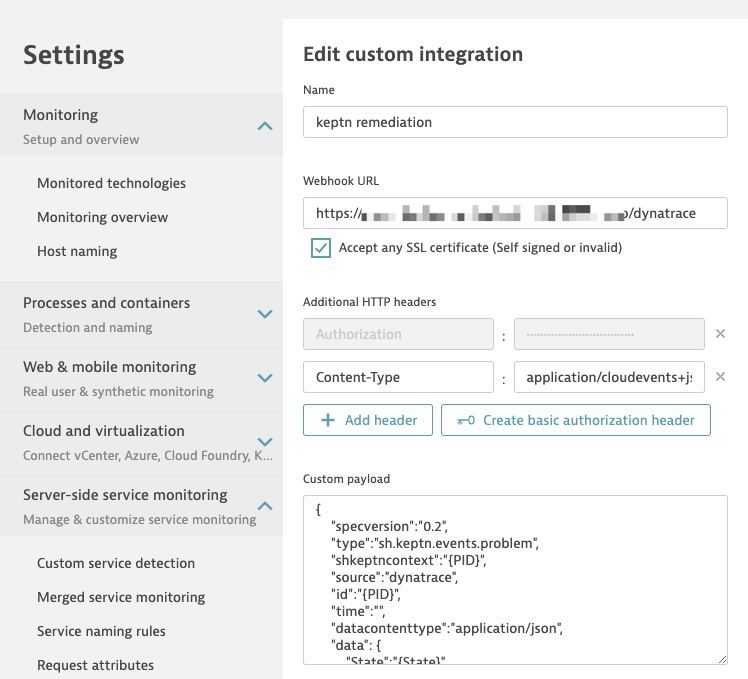
Dynatrace Problem Notification Integration
Adjust anomaly detection in Dynatrace
The Dynatrace platform is built on top of AI, which is great for production use cases, but for this demo we have to override some default settings in order for Dynatrace to trigger the problem.
Before you adjust this setting, make sure to have some traffic on the service in order for Dynatrace to detect and list the service. The easiest way to generate traffic is to use the provided file add-to-carts.sh in the ./usecase folder. This script will add items to the shopping cart and can be stopped after a couple of added items by hitting CTRL+C.
Navigate to the servicenow-service/usecase folder:
cd usecaseRun the script:
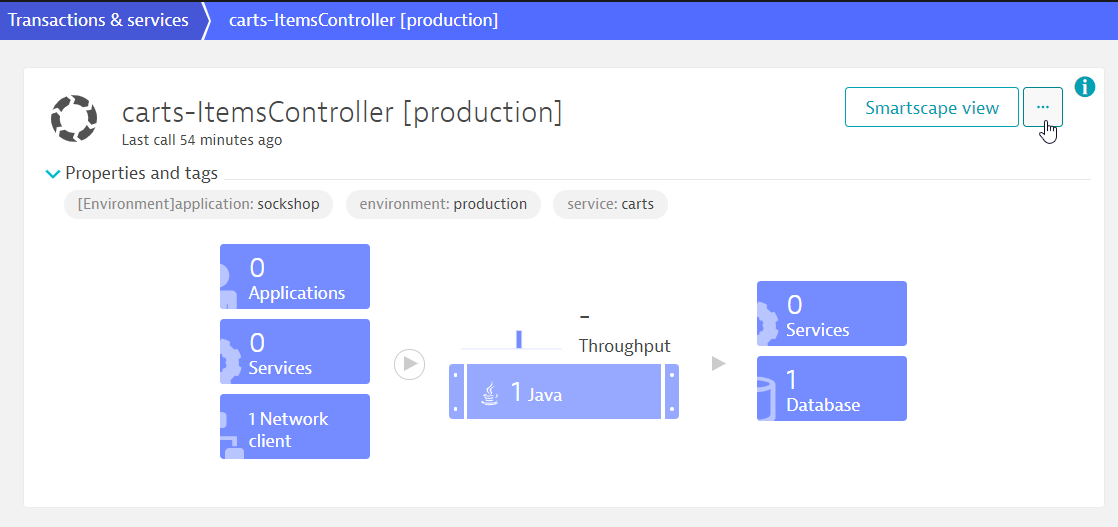
./add-to-cart.sh "carts.sockshop-production.$(kubectl get cm keptn-domain -n keptn -o=jsonpath='{.data.app_domain}')"Once you generated some load, navigate to Transaction & services and find the service ItemsController in the sockshop-production environment.
Open the service and click on the three dots button to Edit the service.
Edit Service In the section Anomaly detection override the global anomaly detection and set the value for the failure rate to use fixed thresholds and to alert if 10% custom failure rate are exceeded. Finally, set the Sensitiviy to High.
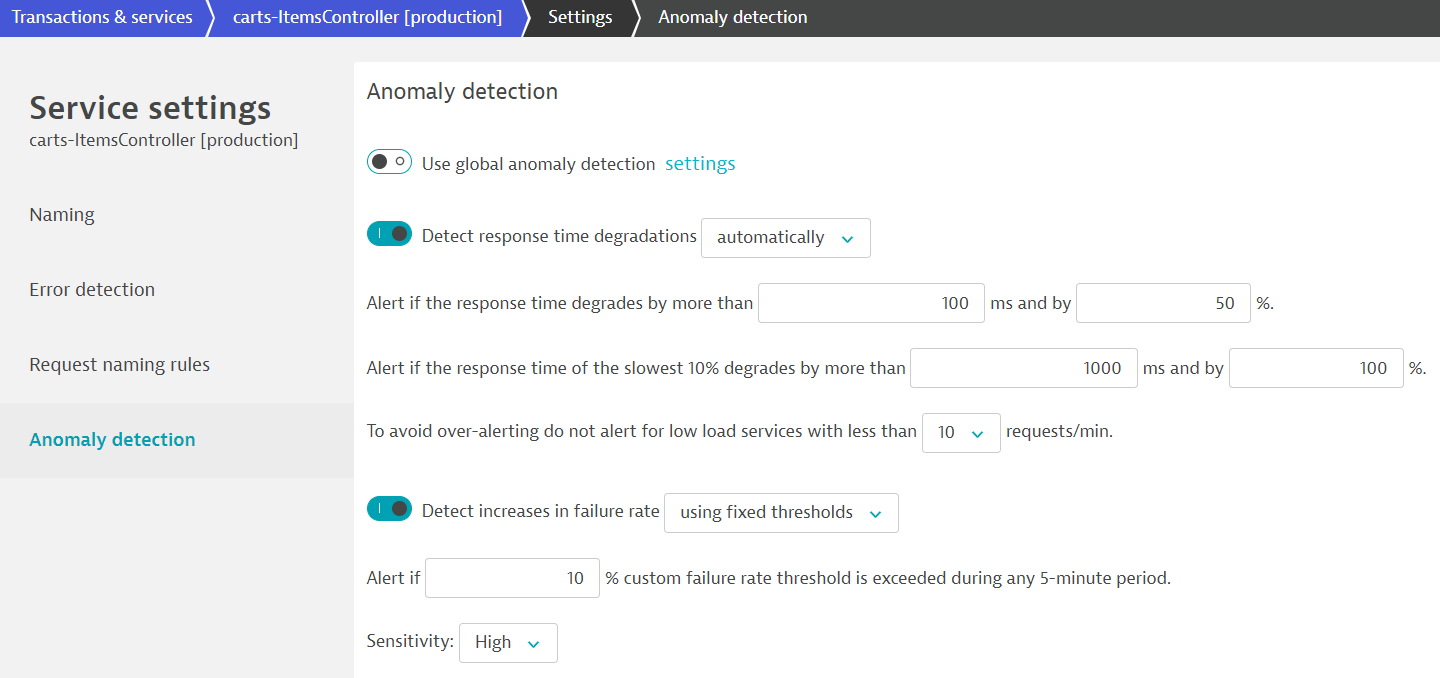
Edit Anomaly Detection
Run the tutorial
Now, all pieces are in place to run the use case of a production incident. Therefore, we will start by generating some load on the carts service in our production environment. Afterwards, we will change configuration of this service at runtime. This will cause some troubles in our production environment, Dynatrace will detect the issue, and will create a problem ticket. Due to the problem notification we just set up, Keptn will be informed about the problem and will forward it to the ServiceNow service that in turn creates an incident in ServiceNow. This incident will trigger a workflow that is able to remediate the issue at runtime. Along the remediation, comments, and details on configuration changes are posted to Dynatrace.
Load generation
Run the script:
./add-to-cart.sh "carts.sockshop-production.$(kubectl get cm keptn-domain -n keptn -o=jsonpath='{.data.app_domain}')"You should see some logging output each time an item is added to your shopping cart:
...
Adding item to cart...
{"id":"3395a43e-2d88-40de-b95f-e00e1502085b","itemId":"03fef6ac-1896-4ce8-bd69-b798f85c6e0b","quantity":73,"unitPrice":0.0}
Adding item to cart...
{"id":"3395a43e-2d88-40de-b95f-e00e1502085b","itemId":"03fef6ac-1896-4ce8-bd69-b798f85c6e0b","quantity":74,"unitPrice":0.0}
Adding item to cart...
{"id":"3395a43e-2d88-40de-b95f-e00e1502085b","itemId":"03fef6ac-1896-4ce8-bd69-b798f85c6e0b","quantity":75,"unitPrice":0.0}
...
Configuration change at runtime
Open another terminal to make sure the load generation is still running and again, navigate to the servicenow-service/usecase folder.
(optional:) Verify that the environment variables you set earlier are still available:
echo $DT_TENANT $DT_API_TOKENIf the environment variables are not set, you can easily set them by following the instructions on how to extract information from the Dynatrace secret.
Run the script:
./enable-promotion.sh "carts.sockshop-production.$(kubectl get cm keptn-domain -n keptn -o=jsonpath='{.data.app_domain}')" 30Note: The parameter
30at the end, which is the value for the configuration change and can be interpreted as for 30 % of the shopping cart interactions a special item is added to the shopping cart. This value can be set from0to100. For this use case the value30is just fine.You will notice that your load generation script output will include some error messages after applying the script:
...
Adding item to cart...
{"id":"3395a43e-2d88-40de-b95f-e00e1502085b","itemId":"03fef6ac-1896-4ce8-bd69-b798f85c6e0b","quantity":80,"unitPrice":0.0}
Adding item to cart...
{"timestamp":1553686899190,"status":500,"error":"Internal Server Error","exception":"java.lang.Exception","message":"promotion campaign not yet implemented","path":"/carts/1/items"}
Adding item to cart...
{"id":"3395a43e-2d88-40de-b95f-e00e1502085b","itemId":"03fef6ac-1896-4ce8-bd69-b798f85c6e0b","quantity":81,"unitPrice":0.0}
...
Problem detection by Dynatrace
Navigate to the ItemsController service by clicking on Transactions & services and look for your ItemsController. Since our service is running in three different environment (dev, staging, and production) it is recommended to filter by the environment:sockshop-production to make sure to find the correct service.
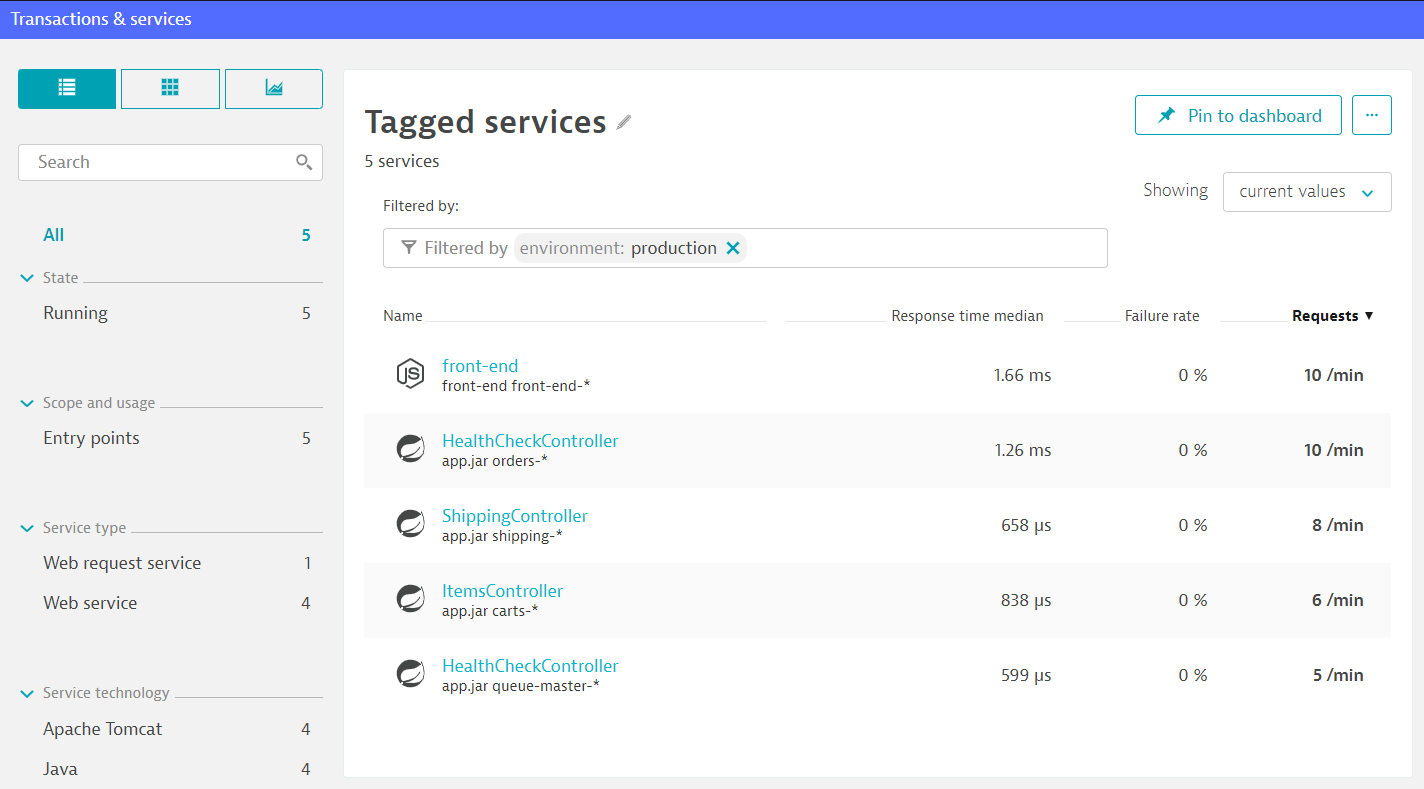
When clicking on the service, in the right bottom corner you can validate in Dynatrace that the configuration change has been applied.
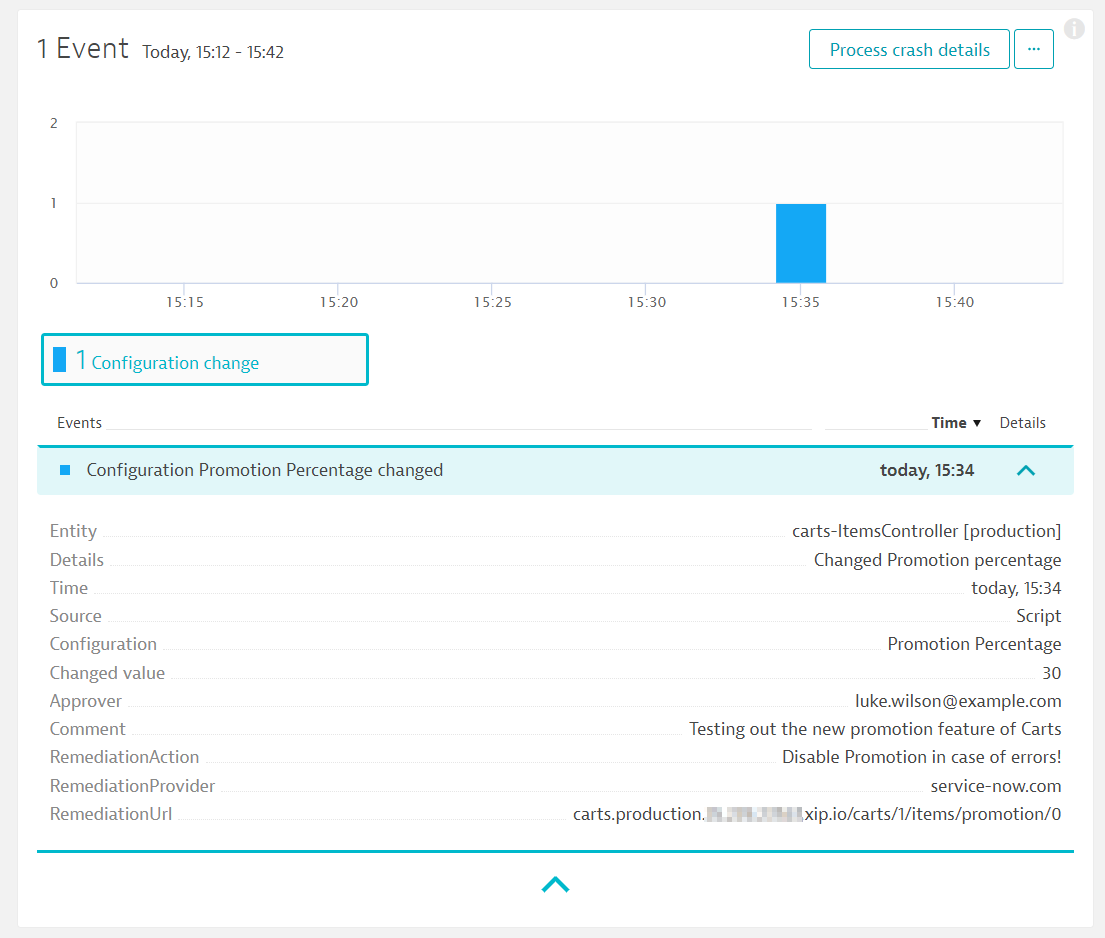
After a couple of minutes, Dynatrace will open a problem ticket based on the increase of the failure rate.
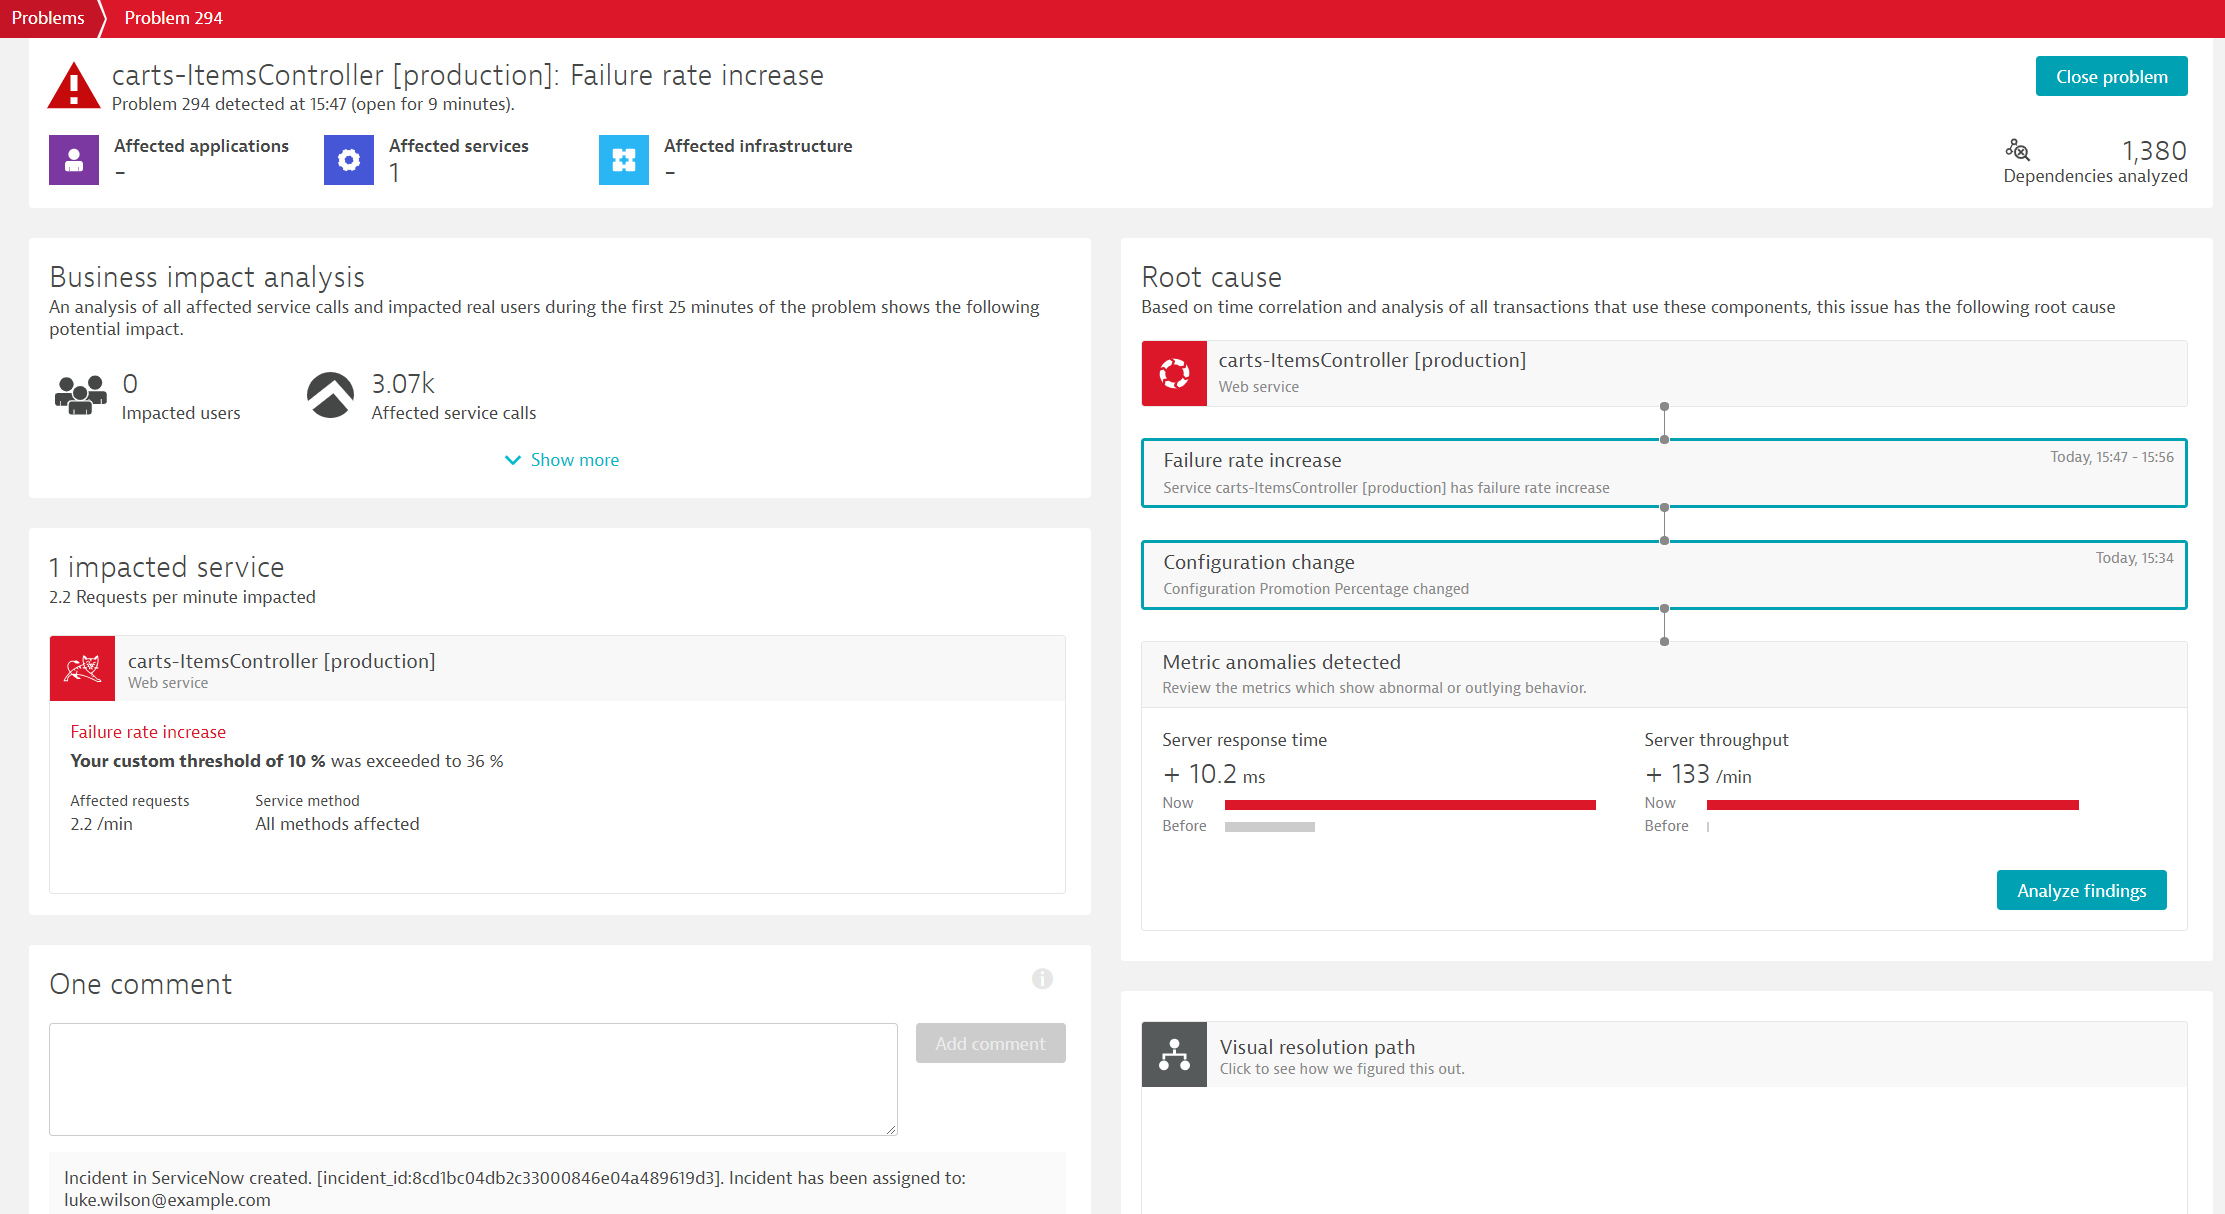
Incident creation & workflow execution by ServiceNow
The Dynatrace problem ticket notification is sent out to Keptn which puts it into the problem channel where the ServiceNow service is subscribed. Thus, the ServiceNow service takes the event and creates a new incident in ServiceNow.
In your ServiceNow instance, you can take a look at all incidents by typing in incidents in the top-left search box and click on Service Desk > Incidents. You should be able to see the newly created incident, click on it to view some details.
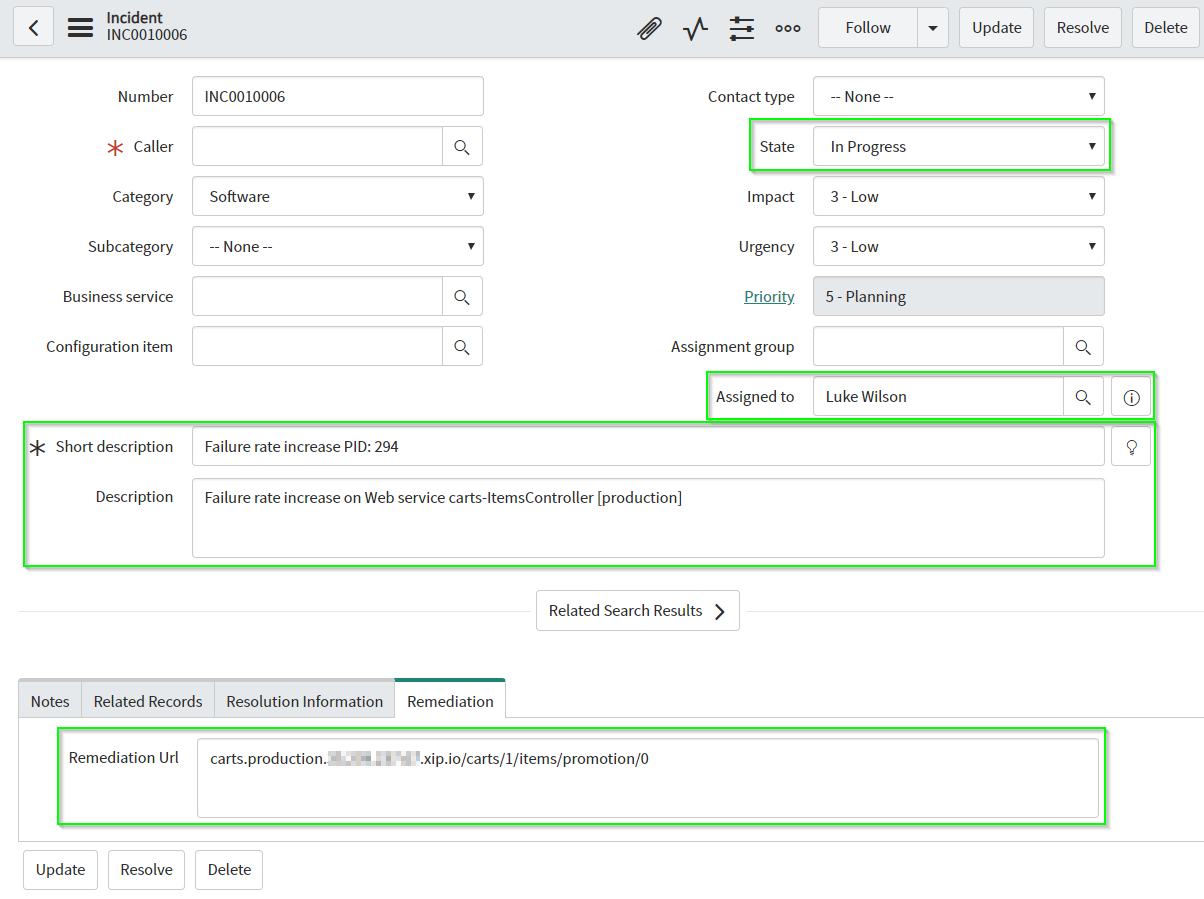
After creation of the incident, a workflow is triggered in ServiceNow that has been setup during the import of the Update Set earlier. The workflow takes a look at the incident, resolves the URL that is stored in the Remediation tab in the incident detail screen. Along with that, a new custom configuration change is sent to Dynatrace. Besides, the ServiceNow service running in Keptn sends comments to the Dynatrace problem to be able to keep track of executed steps.
You can check both the new custom configuration change on the service overview page in Dynatrace as well as the added comment on the problem ticket in Dynatrace.
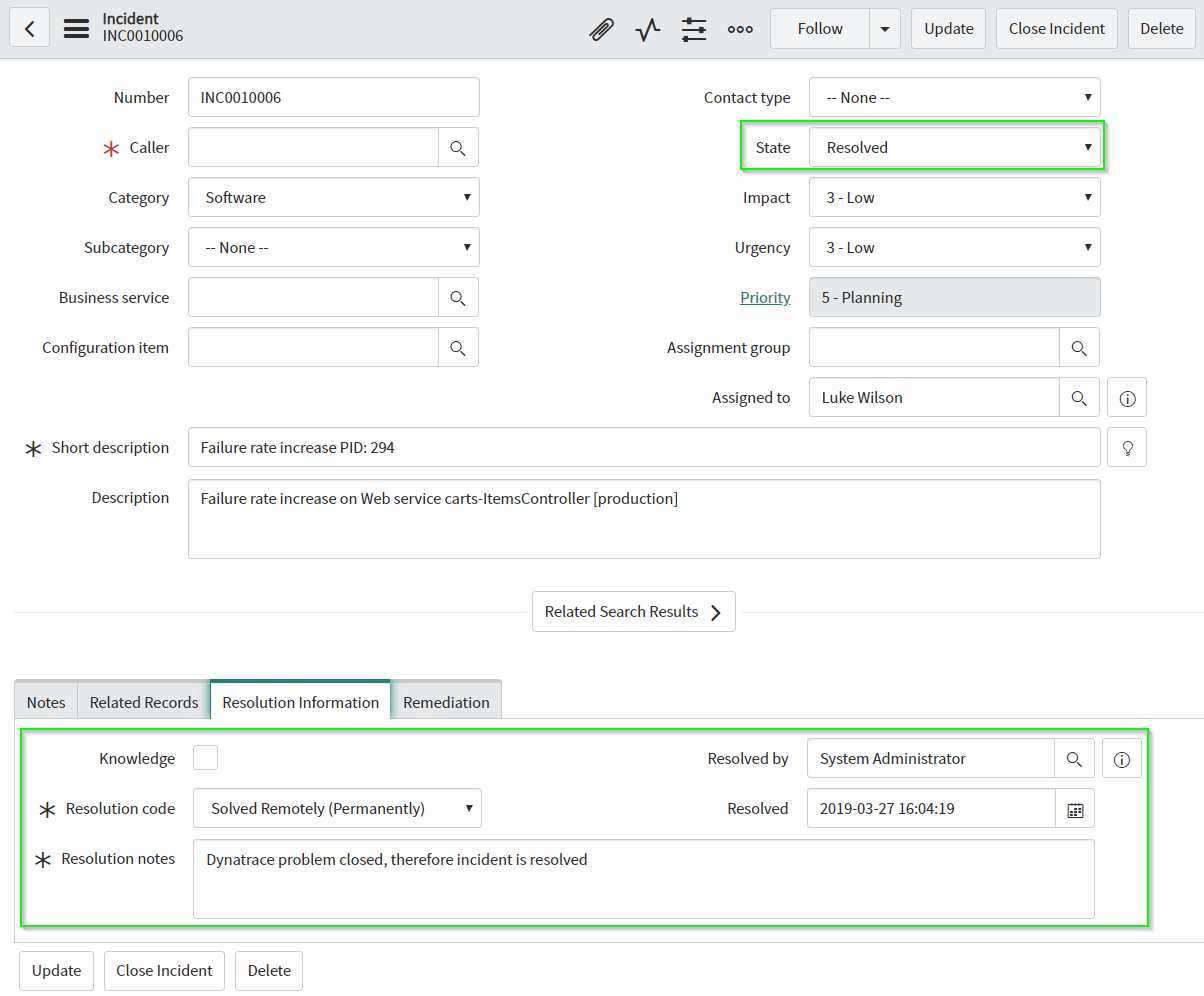
Once the problem is resolved, Dynatrace sends out another notification which again is handled by the ServiceNow service. Now the incidents gets resolved and another comment is sent to Dynatrace. The image shows the updated incident in ServiceNow. The comment can be found if you navigate to the closed problem ticket in Dynatrace.
Troubleshooting
Please note that Dynatrace has its feature called Frequent Issue Detection enabled by default. This means, that if Dynatrace detects the same problem multiple times, it will be classified as a frequent issue and problem notifications won’t be sent out to third party tools. Therefore, the tutorial might not be able to be run a couple of times in a row. To disable this feature:
- Login to your Dynatrace tenant.
- Navigate to Settings > Anomaly detection > Frequent issue detection
- Toggle the switch at Detect frequent issues within transaction and services
In ServiceNow you can take a look at the System Log > All to verify which actions have been executed. You should be able to see some logs on the execution of the Keptn demo workflow as shown in the screenshot:
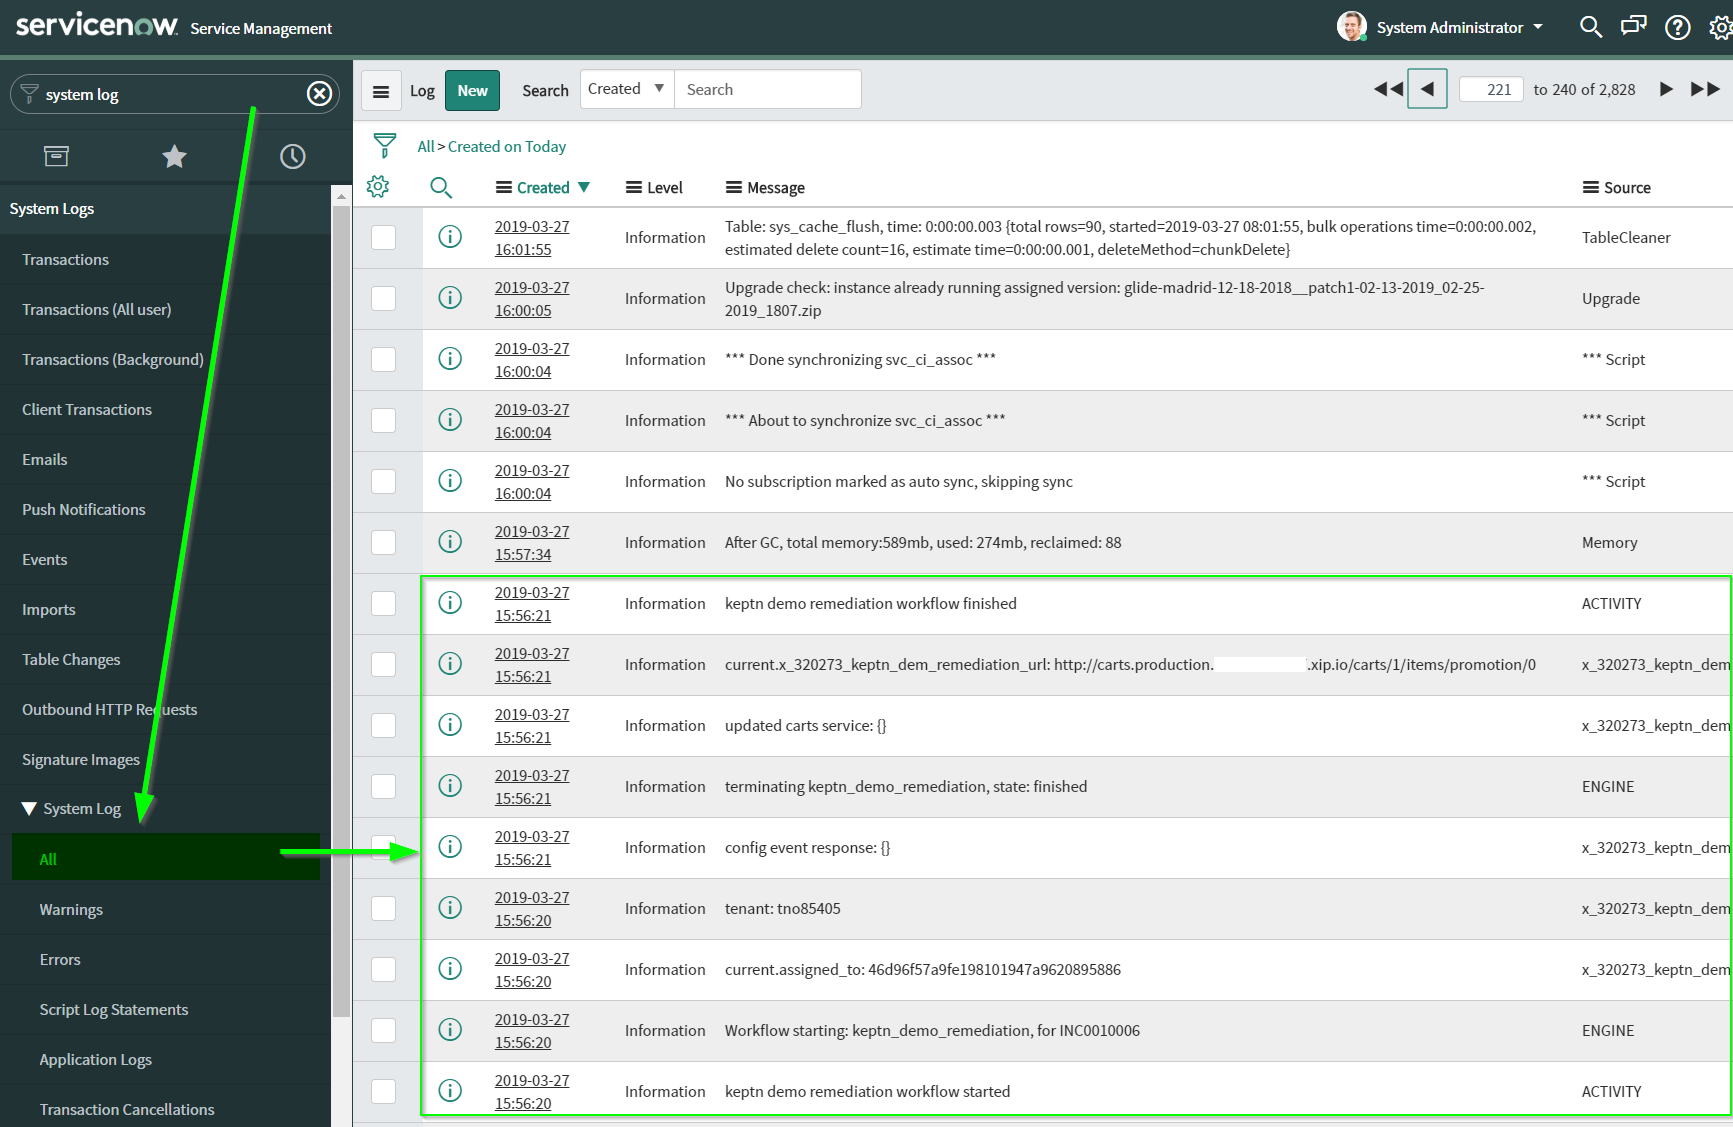
ServiceNow System Log In case Dynatrace detected a problem before the ServiceNow secret was created in your Kubernetes cluster, the remediation will not work. Resolution:
- Create the secret.
- Restart the pod.
kubectl delete pod servicenow-service-XXXXX -n keptn
Built with  by Dynatrace