Home / Docs / Release 0.6.2 / Reference / Setup Monitoring / Dynatrace
Dynatrace
To evaluate the quality gates and allow self-healing in production, we have to set up monitoring to get the needed data.
Setup Dynatrace
Bring your Dynatrace SaaS or Dynatrace-managed tenant
If you don’t have a Dynatrace tenant, sign up for a free trial or a developer account.
Create a Dynatrace API Token
Log in to your Dynatrace tenant and go to Settings > Integration > Dynatrace API. Then, create a new API token with the following permissions:
- Access problem and event feed, metrics, and topology
- Read log content
- Read configuration
- Write configuration
- Capture request data
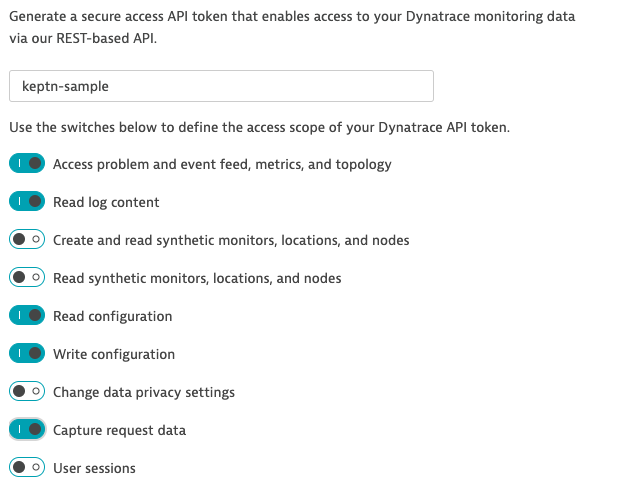
Dynatrace API Token Create a Dynatrace PaaS Token
In your Dynatrace tenant, go to Settings > Integration > Platform as a Service, and create a new PaaS Token.
Store your credentials in a Kubernetes secret by executing the following command. The
DT_TENANThas to be set according to the appropriate pattern:- Dynatrace SaaS tenant:
{your-environment-id}.live.dynatrace.com - Dynatrace-managed tenant:
{your-domain}/e/{your-environment-id}
If running on a Unix/Linux based system, you can use variables for ease of use. Naturally, it is also fine to just replace the values in the
kubectlcommand itself.DT_TENANT=yourtenant.live.dynatrace.com DT_API_TOKEN=yourAPItoken DT_PAAS_TOKEN=yourPAAStokenIf you used the variables, the next command can be copied and pasted without modifications. If you have not set the variable, please make sure to set the right values in the next command.
kubectl -n keptn create secret generic dynatrace --from-literal="DT_TENANT=$DT_TENANT" --from-literal="DT_API_TOKEN=$DT_API_TOKEN" --from-literal="DT_PAAS_TOKEN=$DT_PAAS_TOKEN"- Dynatrace SaaS tenant:
The Dynatrace integration into Keptn is handled by the dynatrace-service. To install the dynatrace-service, execute:
kubectl apply -f https://raw.githubusercontent.com/keptn-contrib/dynatrace-service/0.7.0/deploy/manifests/dynatrace-service/dynatrace-service.yamlWhen the service is deployed, use the following command to install Dynatrace on your cluster. If Dynatrace is already deployed, the current deployment of Dynatrace will not be modified.
keptn configure monitoring dynatrace
Verify Dynatrace setup in your cluster
When keptn configure monitoring is finished, the Dynatrace OneAgent is deployed in your cluster. Execute the following commands to verify the deployment of the OneAgent as well as of the dynatrace-service:
kubectl get svc dynatrace-service -n keptn
NAME                TYPE        CLUSTER-IP    EXTERNAL-IP   PORT(S)    AGE
dynatrace-service   ClusterIP   10.0.44.191   <none>        8080/TCP   2m48s
kubectl get pods -n dynatrace
NAME                                           READY   STATUS    RESTARTS   AGE
dynatrace-oneagent-operator-7f477bf78d-dgwb6   1/1     Running   0          12m
oneagent-5lcqh                                 1/1     Running   0          53s
oneagent-ps6t4                                 1/1     Running   0          53s
Verify Dynatrace configuration
Tagging rules: When you navigate to Settings > Tags > Automatically applied tags in your Dynatrace tenant, you will find following tagging rules:
- keptn_deployment
- keptn_project
- keptn_service
- keptn_stage
This means that Dynatrace will automatically apply tags to your onboarded services.
Problem notification: A problem notification has been set up to inform Keptn of any problems with your services to allow auto-remediation. You can check the problem notification by navigating to Settings > Integration > Problem notifications and you will find a keptn remediation problem notification.
Alerting profile: An alerting profile with all problems set to 0 minutes (immediate) is created. You can review this profile by navigating to Settings > Alerting > Alerting profiles.
Dashboard and Mangement zone: When creating a new Keptn project or executing the keptn configure monitoring command for a particular project (see Note 1), a dashboard and management zone will be generated reflecting the environment as specified in the shipyard file.
Notes
Note 1: If you already have created a project using Keptn and would like to enable Dynatrace monitoring for that project, please execute the following command:
keptn configure monitoring dynatrace --project=PROJECTNAME
Note 2: To monitor the services that are already onboarded in the dev, staging, and production namespace, make sure to restart the pods. If you defined different environments in your shipyard file, please adjust the parameters accordingly.
kubectl delete pods --all --namespace=sockshop-dev
kubectl delete pods --all --namespace=sockshop-staging
kubectl delete pods --all --namespace=sockshop-production
Note 3: If the nodes in your cluster run on Container-Optimized OS (cos) (default for GKE), the Dynatrace OneAgent might not work properly, and another step is necessary. To verify that the OneAgent does not work properly, the output of kubectl get pods -n dynatrace might look as follows:
NAME                                           READY   STATUS             RESTARTS   AGE
dynatrace-oneagent-operator-7f477bf78d-dgwb6   1/1     Running            0          8m21s
oneagent-b22m4                                 0/1     Error              6          8m15s
oneagent-k7jn6                                 0/1     CrashLoopBackOff   6          8m15s
This means that after the initial setup you need to edit the OneAgent custom resource in the Dynatrace namespace and add the following entry to the env section:
env:
- name: ONEAGENT_ENABLE_VOLUME_STORAGE
  value: "true"
To edit the OneAgent custom resource:
kubectl edit oneagent -n dynatraceFinally, don’t forget to restart the pods as described in Note 2 above.
Setup Dynatrace SLI provider
During the evaluation of a quality gate, the Dynatrace SLI provider is required that is implemented by an internal Keptn service, the dynatrace-sli-service. This service will fetch the values for the SLIs that are referenced in an SLO configuration.
To install the dynatrace-sli-service, execute:
kubectl apply -f https://raw.githubusercontent.com/keptn-contrib/dynatrace-sli-service/0.4.0/deploy/service.yamlThe dynatrace-sli-service needs access to a Dynatrace tenant. If you have completed the steps from Setup Dynatrace, the dynatrace-sli-service uses the already provided credentials. Otherwise, create a secret containing the Tenant ID and API token.
The
DT_TENANThas to be set according to the appropriate pattern:- Dynatrace SaaS tenant:
{your-environment-id}.live.dynatrace.com - Dynatrace-managed tenant:
{your-domain}/e/{your-environment-id}
kubectl -n keptn create secret generic dynatrace --from-literal="DT_API_TOKEN=<DT_API_TOKEN>" --from-literal="DT_TENANT=<DT_TENANT>"- Dynatrace SaaS tenant:
Configure custom SLIs
To tell the dynatrace-sli-service how to acquire the values of an SLI, the correct query needs to be configured. This is done by adding an SLI configuration to a project, stage, or service using the add-resource command. The resource identifier must be dynatrace/sli.yaml.
- In the below example, the SLI configuration as specified in the
sli-config-dynatrace.yamlfile is added to the servicecartsin stagehardeningfrom projectsockshop.
keptn add-resource --project=sockshop --stage=hardening --service=carts --resource=sli-config-dynatrace.yaml --resourceUri=dynatrace/sli.yaml
Note: The add-resource command can be used to store a configuration on project-, stage-, or service-level. In the context of an SLI configuration, Keptn first uses SLI configuration stored on the service-level, then on the stage-level, and finally Keptn uses SLI configuration stored on the project-level.
Example for custom SLIs
If you want to add your custom SLIs, take a look at the following example which can be used as a template for your own SLIs:
---
spec_version: '1.0'
indicators:
  throughput: "builtin:service.requestCount.total:merge(0):count?scope=tag(keptn_project:$PROJECT),tag(keptn_stage:$STAGE),tag(keptn_service:$SERVICE),tag(keptn_deployment:$DEPLOYMENT)"
  error_rate: "builtin:service.errors.total.count:merge(0):avg?scope=tag(keptn_project:$PROJECT),tag(keptn_stage:$STAGE),tag(keptn_service:$SERVICE),tag(keptn_deployment:$DEPLOYMENT)"
  response_time_p50: "builtin:service.response.time:merge(0):percentile(50)?scope=tag(keptn_project:$PROJECT),tag(keptn_stage:$STAGE),tag(keptn_service:$SERVICE),tag(keptn_deployment:$DEPLOYMENT)"
  response_time_p90: "builtin:service.response.time:merge(0):percentile(90)?scope=tag(keptn_project:$PROJECT),tag(keptn_stage:$STAGE),tag(keptn_service:$SERVICE),tag(keptn_deployment:$DEPLOYMENT)"
  response_time_p95: "builtin:service.response.time:merge(0):percentile(95)?scope=tag(keptn_project:$PROJECT),tag(keptn_stage:$STAGE),tag(keptn_service:$SERVICE),tag(keptn_deployment:$DEPLOYMENT)"
Set DT_CUSTOM_PROP before onboarding a service
The created tagging rules in Dynatrace expect the environment variable DT_CUSTOM_PROP for your onboarded service. Consequently, make sure to specify the environment variable for deployment in the Helm chart of the service you are going to onboard with the following value:
env:
- name: DT_CUSTOM_PROP
  value: "keptn_project={{ .Values.keptn.project }} keptn_service={{ .Values.keptn.service }} keptn_stage={{ .Values.keptn.stage }} keptn_deployment={{ .Values.keptn.deployment }}"
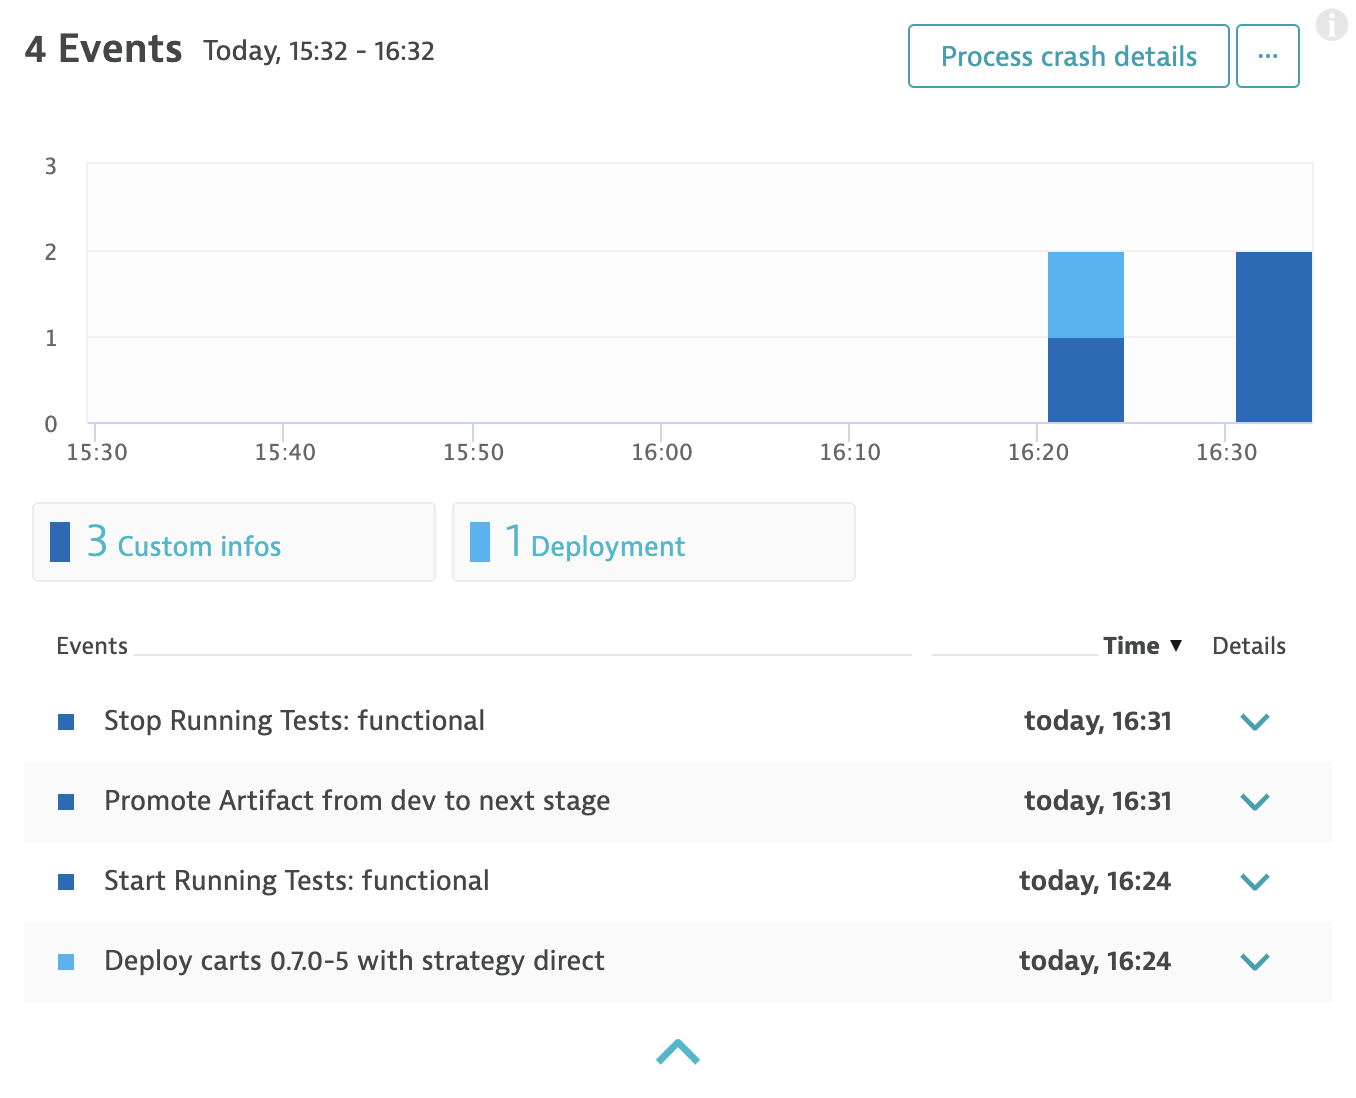
See Keptn events in Dynatrace
The dynatrace-service in Keptn will take care of pushing events of the Keptn workflow to the artifacts that have been onboarded. For example, the deployment and custom infos - like starting and finishing of tests - will appear in the details screen of your services in your Dynatrace tenant.
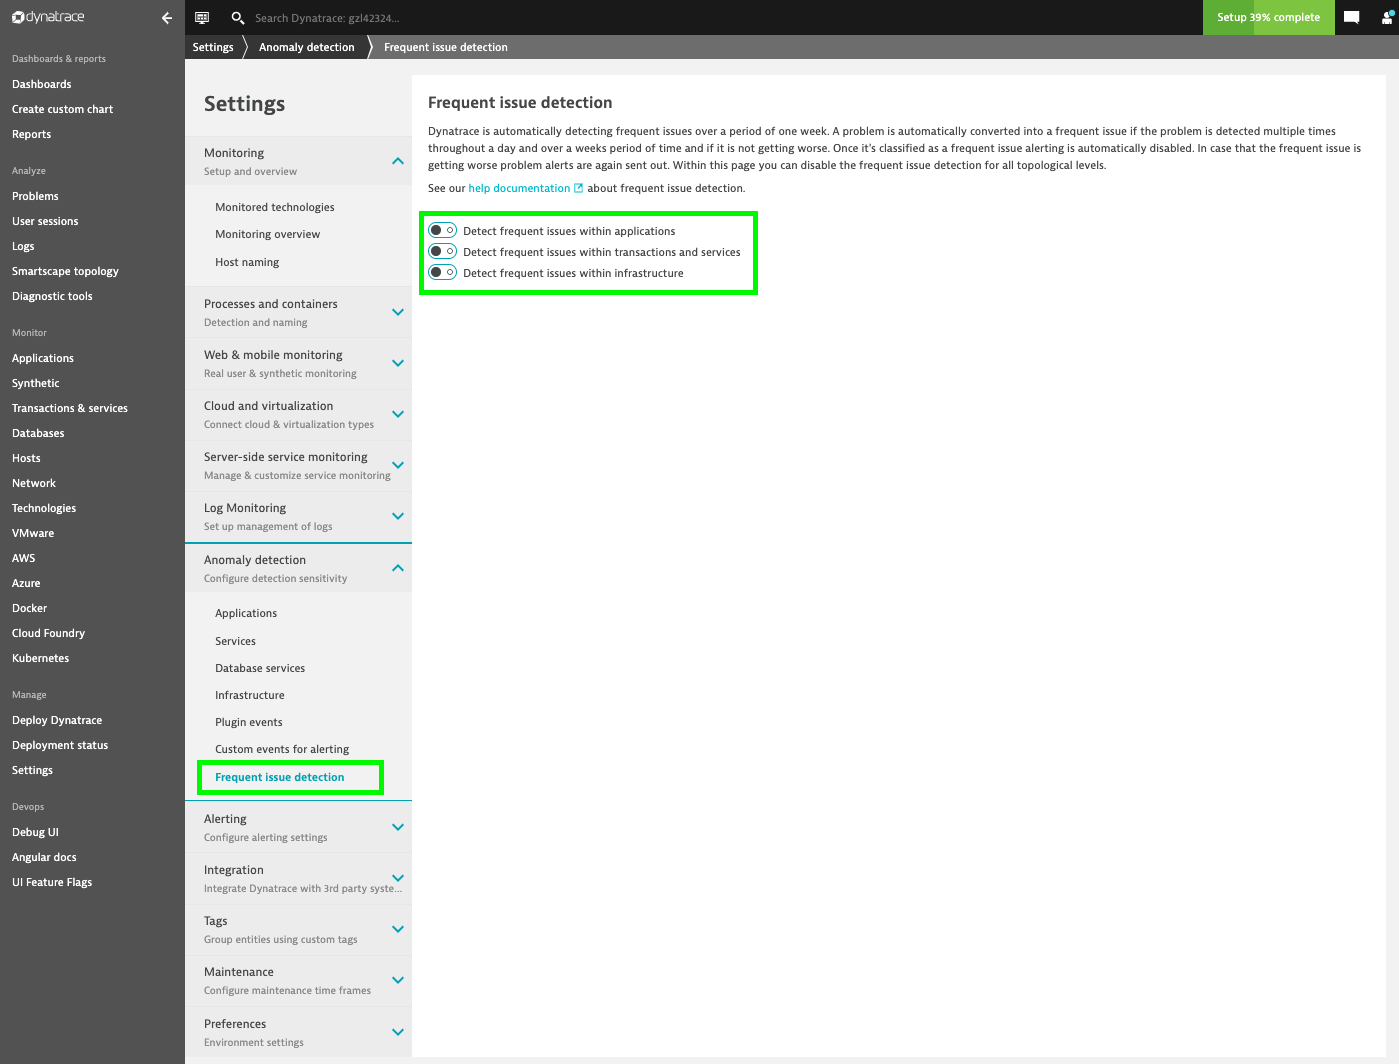
Disable frequent issue detection
Keptn relies on Dynatrace sending brand new alerts everytime a problem is detected. Therefore we need to disable the Frequent Issue Detection within Dynatrace. To do so, go to Settings > Anomaly Detection > Frequent Issue Detection, and disable all switches found in this menu:
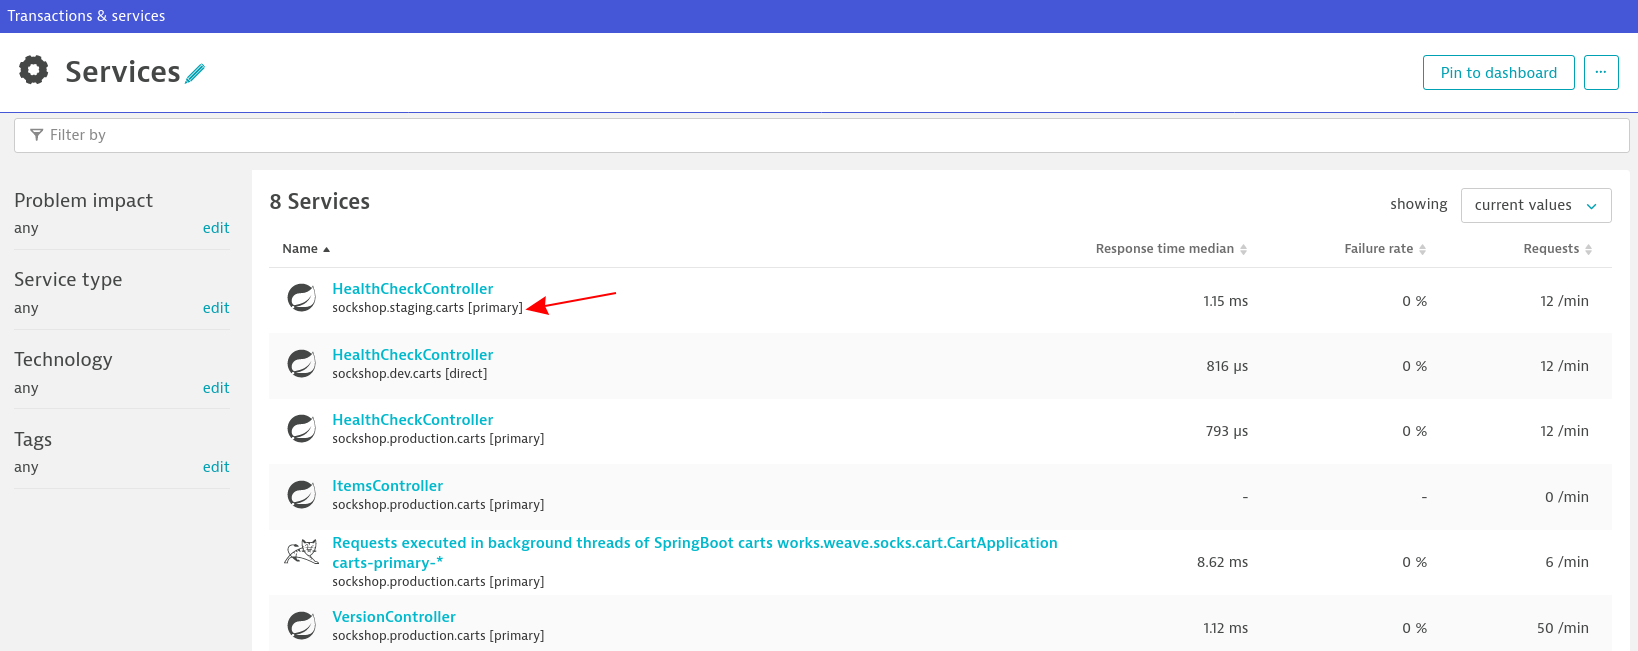
Create a process group naming rule in Dynatrace
While it is not a technical requirement, we encourage you to set up a process group naming rule within Dynatrace for better visibility of services, e.g.:
Screenshot shows the applied rules in action
To configure this rule, follow these steps:
- Go to Settings, Process and containers, and click on Process group naming.
- Create a new process group naming rule with Add new rule.
- Edit that rule:
- Rule name:
Keptn Processgroup Naming - Process group name format:
{ProcessGroup:Environment:keptn_project}.{ProcessGroup:Environment:keptn_stage}.{ProcessGroup:Environment:keptn_service} [{ProcessGroup:Environment:keptn_deployment}] - Condition:
keptn_deployment (Environment)>exists
- Rule name:
Click on Preview and Save.
Screenshot shows this rule definition.
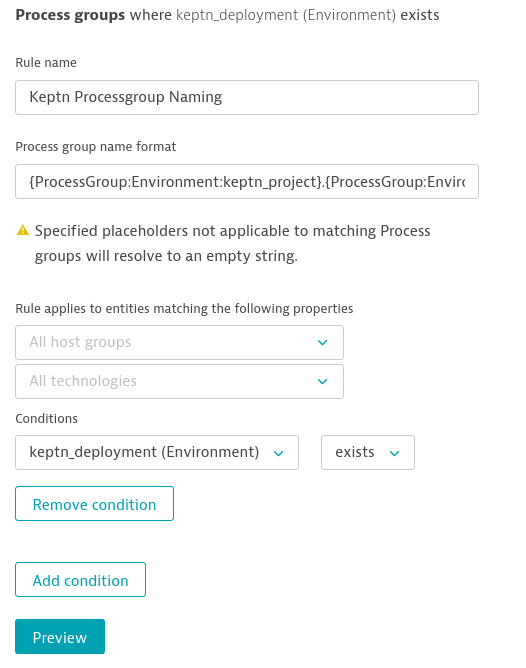
Dynatrace naming rule
Uninstall Dynatrace
If you want to uninstall Dynatrace, there are scripts provided to do so. Uninstalling Keptn will not automatically uninstall Dynatrace.
- (optional) If you do not have the dynatrace-service repository, clone the latest release using:
git clone --branch 0.7.0 https://github.com/keptn-contrib/dynatrace-service --single-branch
- Go to correct folder and execute the
uninstallDynatrace.shscript:
./dynatrace-service/deploy/scripts/uninstallDynatrace.sh
Troubleshooting
I have created the wrong secret
If you have accidentially created a secret with wrong credentials or have not replaced the placeholders correctly, you can delete the secret and create it again.
kubectl delete secret dynatrace -n keptn
Create it again by following the instructions.
The installation of the OneAgent on my cluster failed
If the OneAgent pods are not in a READY and Running state, there are two common mistakes.
NAME                                           READY   STATUS             RESTARTS   AGE
dynatrace-oneagent-operator-7f477bf78d-dgwb6   1/1     Running            0          8m21s
oneagent-b22m4                                 0/1     Error              6          8m15s
oneagent-k7jn6                                 0/1     CrashLoopBackOff   6          8m15s
Cluster is running on Container-Optimized OS (COS)
Verify this by checking the logs of any crashing pod by executing the following command:
kubectl logs oneagent-CRASHING-POD-ID -n dynatrace
If the logs contain similar lines as in the following paragraph, please execute the needed steps for nodes running on COS.
chmod: /mnt/host_root/opt: Read-only file system
21:25:41 Warning: Cannot change permisions of /mnt/host_root/opt directory to u+rwx,g+rx,o+rx.
mkdir: can't create directory '/mnt/host_root/opt/dynatrace': Read-only file system
21:25:41 Warning: Cannot create /mnt/host_root/opt/dynatrace directory.
mkdir: can't create directory '/mnt/host_root/opt/dynatrace/': Read-only file system
21:25:41 Warning: Cannot create /mnt/host_root/opt/dynatrace/oneagent directory.
mkdir: can't create directory '/mnt/host_root/opt/dynatrace/': Read-only file system
21:25:41 Warning: Cannot create /mnt/host_root/opt/dynatrace/oneagent/log directory.
mkdir: can't create directory '/mnt/host_root/opt/dynatrace/': Read-only file system
21:25:41 Warning: Cannot create /mnt/host_root/opt/dynatrace/oneagent/log/process directory.
mkdir: can't create directory '/mnt/host_root/opt/dynatrace/': Read-only file system
21:25:41 Warning: Cannot create /mnt/host_root/opt/dynatrace/oneagent/log/installer directory.
mkdir: can't create directory '/mnt/host_root/opt/dynatrace/': Read-only file system
21:25:41 Warning: Cannot create /mnt/host_root/opt/dynatrace/oneagent/log/os directory.
mkdir: can't create directory '/mnt/host_root/opt/dynatrace/': Read-only file system
21:25:41 Warning: Cannot create /mnt/host_root/opt/dynatrace/oneagent/log/network directory.
mkdir: can't create directory '/mnt/host_root/opt/dynatrace/': Read-only file system
21:25:41 Warning: Cannot create /mnt/host_root/opt/dynatrace/oneagent/log/plugin directory.
mkdir: can't create directory '/mnt/host_root/opt/dynatrace/': Read-only file system
21:25:41 Warning: Cannot create /mnt/host_root/opt/dynatrace/oneagent/log/loganalytics directory.
touch: /mnt/host_root/opt/dynatrace/oneagent/log/installer/installation_docker_61647.log: No such file or directory
21:25:41 Started agent deployment as a container, PID 61647.
Provided tokens and/or tenant URL are incorrect
Verify this by checking the logs of any crashing pod by executing the following command:
kubectl logs oneagent-CRASHING-POD-ID -n dynatrace
If the logs contain similar lines as in the following paragraph, please double check the dynatrace secret that you created earlier.
21:27:51 Downloading agent to /tmp/Dynatrace-OneAgent-Linux.sh via https://abc123.live.dynatrace.com/api/v1/deployment/installer/agent/unix/default/latest?Api-Token=xxxxxxxxx&arch=x86&flavor=default
21:27:52 Error: Installer download failed, wget returned: 6, HTTP response code: 401
In this case the OneAgent operator can not fetch the OneAgent installation files for your tenant. Please double check the provided credentials:
- Dynatrace Tenant URL must not contain
https://as a prefix and there is no trailing slash/allowed at the end:- valid tenant ID: abc2345.live.dynatrace.com
- invalid tenant ID: https://abc2345.live.dynatrace.com/
- API Token and PaaS Token are two distinct tokens, please double check that they are set to their correct values.
You can delete and recreate the credentials as described here.
Built with  by Dynatrace