Home / Docs / Release 0.6.2 / Tutorials / Self-healing / Self-healing with Feature Flags
Self-healing with Feature Flags
Demonstrates how to use the self-healing mechanisms of Keptn to automatically set feature flags in an Unleash feature flag server.
About this tutorial
In this tutorial, you will learn how to use the capabilities of Keptn to provide self-healing for an application with feature flags based on the Unleash feature toggle framework. Please note that within this tutorial we use the carts microservice (see prerequesits below) which is already prepared to work with feature toggles.
Prerequisites
- See Self-healing.
- Double-check that you have disabled frequent issue detection within Dynatrace.
Onboard and deploy the Unleash server
Note: For the sake of this tutorial, we will onboard Unleash as a Keptn project. The carts microservice is already pre-configured for this.
To quickly get an Unleash server up and running with Keptn, follow these instructions:
Make sure you are in the correct folder of your examples directory:
cd examples/unleash-serverCreate a new project using the keptn create project command:
keptn create project unleash --shipyard=./shipyard.yamlOnboard unleash and unleash-db using the keptn onboard service command:
keptn onboard service unleash-db --project=unleash --chart=./unleash-db
keptn onboard service unleash --project=unleash --chart=./unleash
Send new artifacts for unleash and unleash-db using the keptn send new-artifact command:
keptn send event new-artifact --project=unleash --service=unleash-db --image=postgres:10.4
keptn send event new-artifact --project=unleash --service=unleash --image=docker.io/keptnexamples/unleash:1.0.0
Get the URL (
unleash.unelash-dev.KEPTN_DOMAIN):echo http://unleash.unleash-dev.$(kubectl get cm keptn-domain -n keptn -o=jsonpath='{.data.app_domain}')Open the URL in your browser and log in using the following credentials:
- Username: keptn
- Password: keptn
You should be able to login using the credentials keptn/keptn.
Configure the Unleash server
In this tutorial, we are going to introduce feature toggles for two scenarios:
Feature flag for a very simple caching mechanism that can speed up the delivery of the website since it skips the calls to the database but instead replies with static content.
Feature flag for a promotional campaign that can be enabled whenever you want to run a promotional campaign on top of your shopping cart.
To set up both feature flags, navigate to your Unleash server and log in.
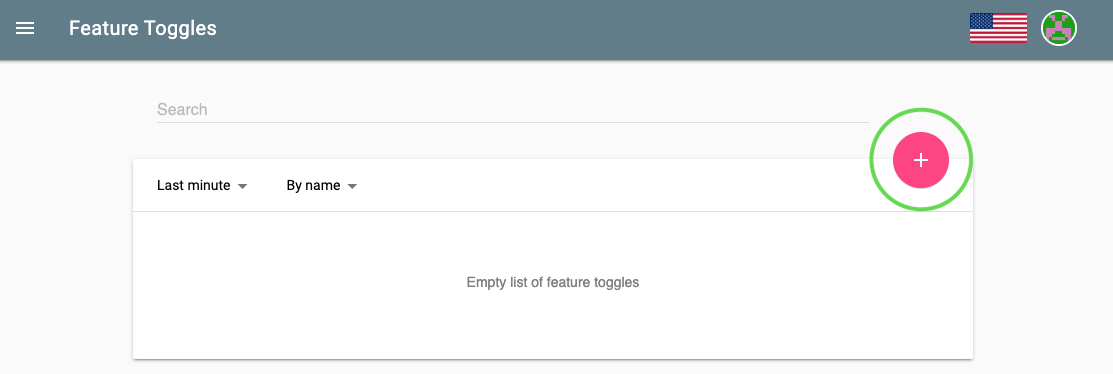
Click on the red + to add a new feature toggle.
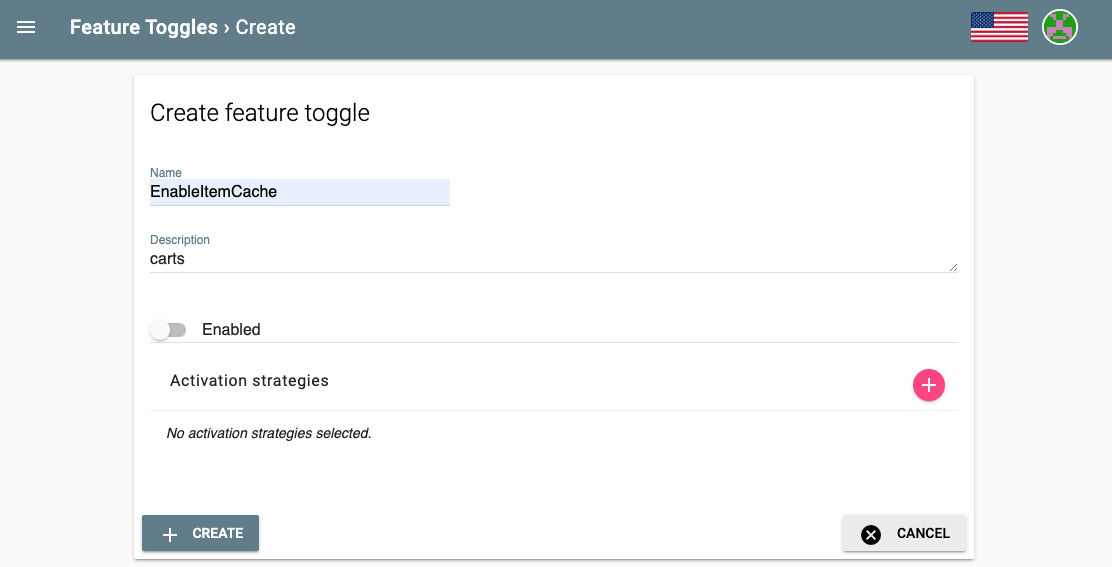
Add new feature toggle Name the feature toggle EnableItemCache and add carts in the description field.
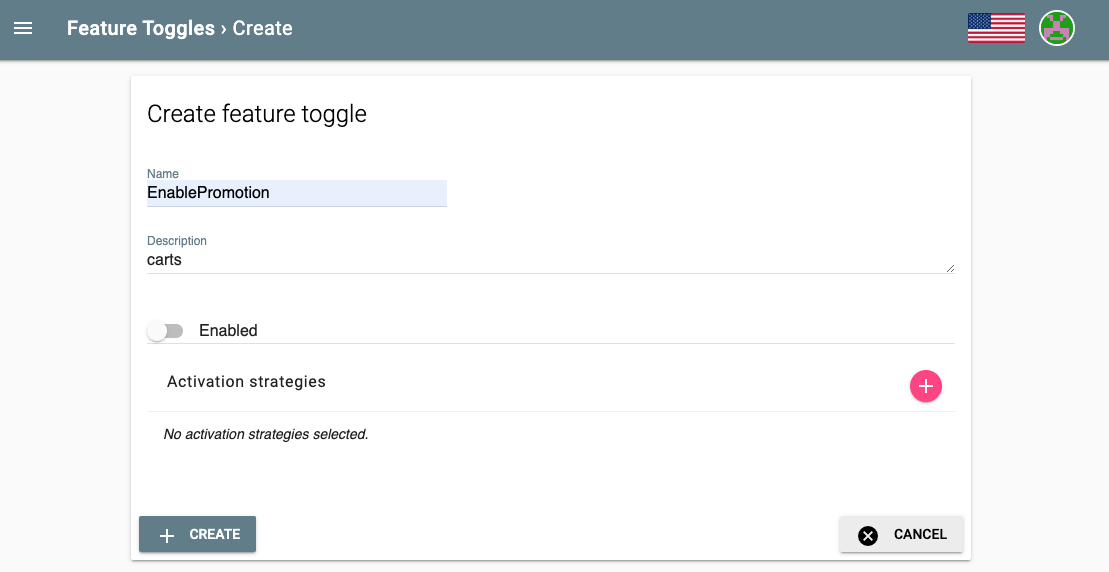
Add new feature toggle Create another feature toggle by following the same procedure and by naming it the feature toggle EnablePromotion and by adding carts in the description field.
Add new feature toggle
Configure Keptn
Now, everything is set up in the Unleash server. For Keptn to be able to connect to the Unleash server, we have to add a secret with the Unleash API URL as well as the Unleash tokens.
In order for Keptn to be able to use the Unleash API, we need to add the credentials as a secret to our Keptn namespace. In this tutorial, we do not have to change the values for UNLEASH_SERVER, UNLEASH_USER, and UNLEASH_TOKEN, but in your own custom scenario this might be needed to change it to your actual Unleash URL, user and token. As said, in this tutorial we can use the following command as it is:
kubectl -n keptn create secret generic unleash --from-literal="UNLEASH_SERVER_URL=http://unleash.unleash-dev/api" --from-literal="UNLEASH_USER=keptn" --from-literal="UNLEASH_TOKEN=keptn"Keptn has to be aware of the new secret to connect to the Unleash server and to set the feature toggles. Therefore, the remediation-service must be restarted:
kubectl delete pod -l=run=remediation-service -n keptnFinally, switch to the carts example (
cd examples/onboarding-carts) and add the following remediation instructionsremediations: - name: "Response time degradation" actions: - action: featuretoggle value: EnableItemCache:on - name: "Failure rate increase" actions: - action: featuretoggle value: EnablePromotion:offusing the command:
keptn add-resource --project=sockshop --service=carts --stage=production --resource=remediation_feature_toggle.yaml --resourceUri=remediation.yamlNote: The file describes remediation actions (e.g.,
featuretoggle) in response to problems/alerts (e.g.,Response time degradation) that are sent to Keptn.
Now that everything is set up, next we are going to hit the application with some load and toggle the feature flags.
Run the tutorial
To simulate user traffic, we are going to execute the following script that will constantly add items to the shopping cart.
Change into the folder with the load generation program within the examples repo:
cd load-generation/binStart the according load generation program depending on your operating system (replace *OS with either linux, mac or win):
./loadgenerator-_OS_ "http://carts.sockshop-production.$(kubectl get cm keptn-domain -n keptn -o=jsonpath='{.data.app_domain}')"Now, go back to your Unleash server in your browser. In this tutorial, we are going to turn on the promotional campaign, which purpose is to add promotional gifts to about 30 % of the user interactions that put items in their shopping cart.
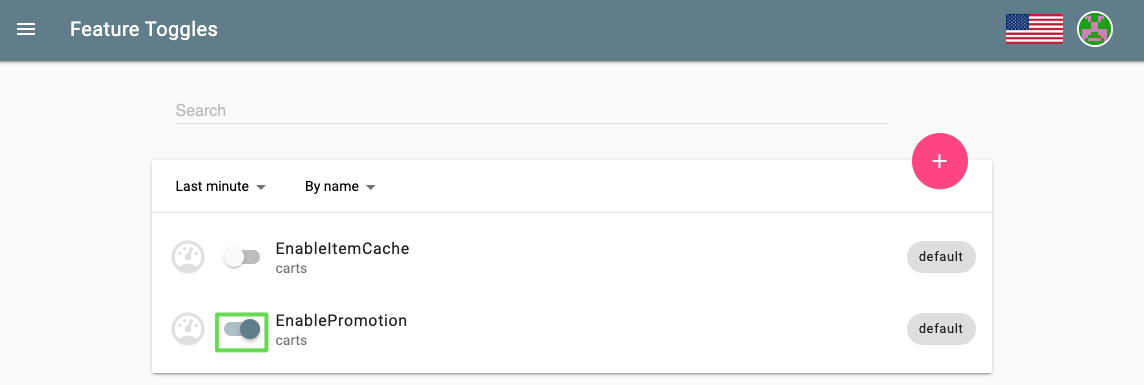
Click on the toggle next to EnablePromotion to enable this feature flag.
Enable feature toggle By enabling this feature flag, a not implemented function is called resulting in a NotImplementedFunction error in the source code and a failed response. After a couple of minutes, the monitoring tool will detect an increase in the failure rate and will send out a problem notification to Keptn.
Keptn will receive the problem notification/alert and look for a remediation action that matches this problem. Since we have added the
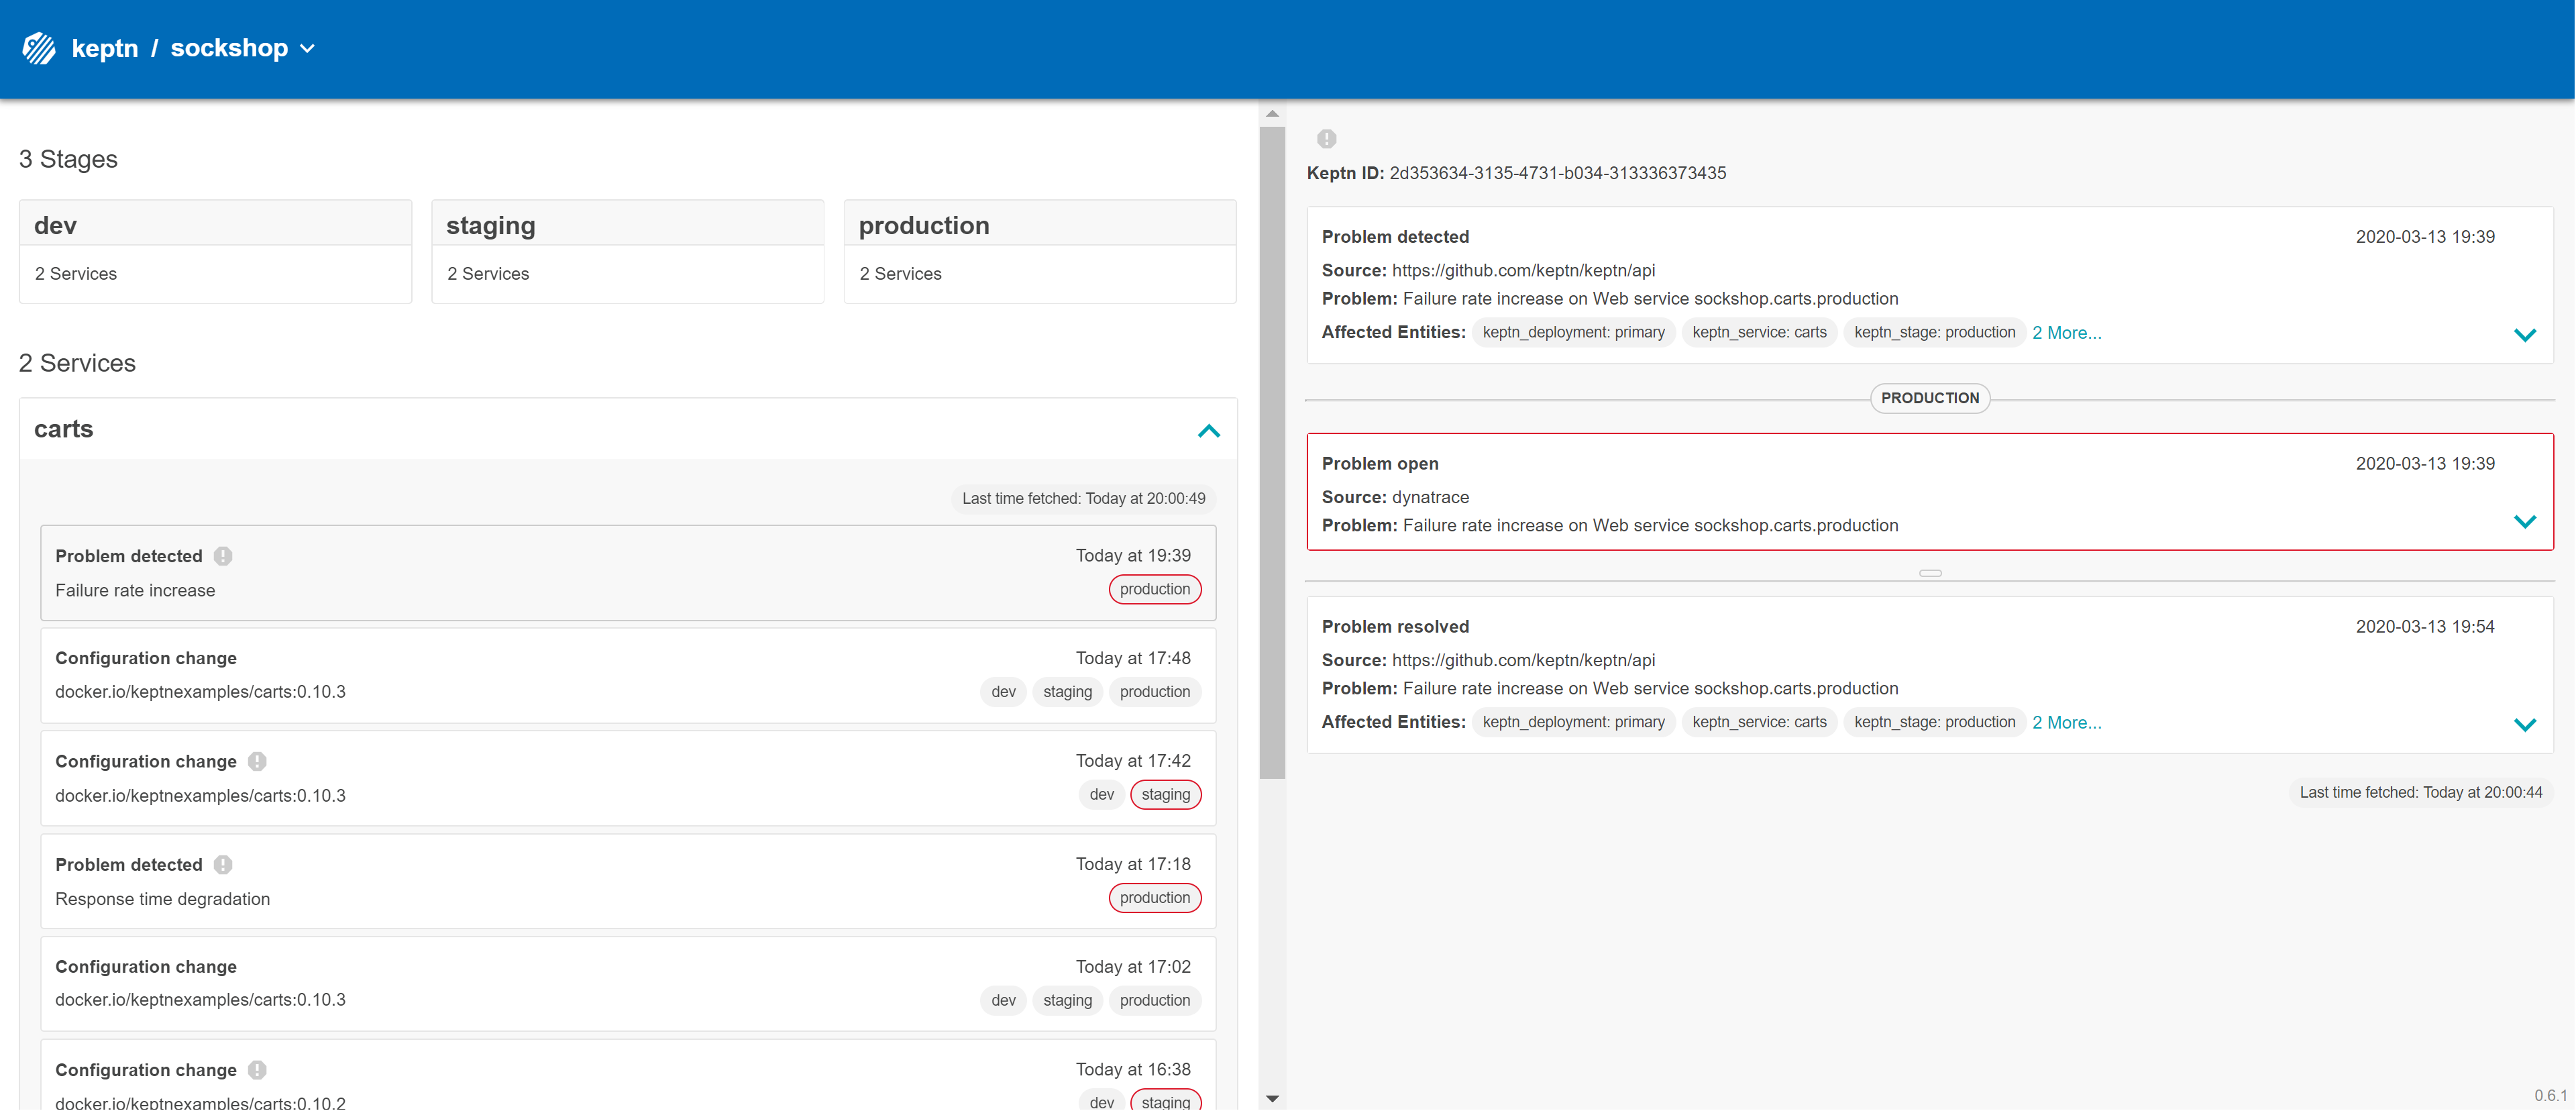
remediation.yamlbefore, Keptn will find a remediation action and will trigger the corresponding action that will disable the feature flag.Finally, take a look into the Keptn’s Bridge to see that an open problem has been resolved:
Problem event in Keptn's Bridge
Summary
In this tutorial, you have seen how Keptn can be configured to automatically toggle feature flags in your Unleash server in response to a problem/alert sent by a monitoring solution.


